Webブラウザ上で図形や画像を動的に描画できるCanvasは、ゲーム開発や画像編集、アニメーション実装において必須となる要素です。
本記事では、基本の描画メソッド、レスポンシブ対応や解像度の最適化、画像処理やデータ保存まで解説します。
Canvas(キャンバス)とは:基本と使い方
Webページ上で、本物の画用紙に絵の具で絵を描くように、図形やアニメーションを動的に描画できる機能が「canvasタグ」です。
canvasタグは、JavaScriptを使ってピクセルベースのグラフィックを描画する透明な領域(キャンバス)を提供する仕組みです。
ここでは、、canvasタグの具体的な使い方、SVGやWebGLといった他の技術との違いを解説します。
canvasタグの書き方と2Dコンテキスト- SVGやWebGLとの違いと使い分け
canvasタグの書き方と2Dコンテキスト
Canvasを使うための準備はシンプルです。
HTMLに<canvas>タグを配置し、JavaScriptで要素を取得して描画命令を出します。
その際、「2D(平面)の絵を描く筆と絵の具のセット」を取得するメソッドがgetContext('2d')です。
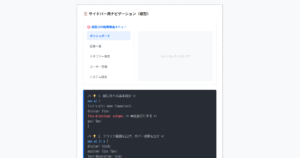
Canvasの「実際の描画解像度(画用紙の本来のサイズ)」は、CSSではなくHTMLの属性(widthとheight)で直接指定しなければなりません。
CSSは画面上での表示サイズをコントロールするものと明確に区別してください。
⭕️ HTML属性でサイズを指定した正しいCanvas
<canvas style=”width:400px; height:200px;”></canvas>
<!– 💡 良い例:属性として指定する –>
<canvas id=”myCanvas” width=”400″ height=”200″></canvas>
/* 💡 JSで2Dコンテキストを取得して描画 */
const cvs = document.getElementById(‘myCanvas’);
const ctx = cvs.getContext(‘2d’); // 2D描画ツールを取得
// 赤い四角形を描く
ctx.fillStyle = ‘red’;
ctx.fillRect(50, 50, 100, 100);
HTMLコード表示
<div class="hcanvas-sec1-wrapper">

  <div class="hcanvas-sec1-demo-area">
    <div class="hcanvas-sec1-box">
      <div class="hcanvas-sec1-label">🎨 getContext('2d')による基本の描画</div>

      <div class="hcanvas-sec1-visual">
        <p style="font-size:12px; color:#198754; font-weight:bold; margin:0 0 5px 0;">⭕️ HTML属性でサイズを指定した正しいCanvas</p>

        <div class="hcanvas-sec1-canvas-container">
          <canvas id="myCanvas" width="400" height="200" class="hcanvas-sec1-canvas-element"></canvas>
        </div>

        <div style="text-align:center; margin-top:10px;">
          <button class="hcanvas-sec1-draw-btn" onclick="drawExample()">描画する</button>
          <button class="hcanvas-sec1-clear-btn" onclick="clearExample()">消去する</button>
        </div>
      </div>

      <div class="hcanvas-sec1-code">
        <!-- 💡 悪い例:CSSで指定すると中身が歪む --><br>
        <canvas <span class="hcanvas-sec1-hl-red">style="width:400px; height:200px;"</span>></canvas><br><br>
        <!-- 💡 良い例:属性として指定する --><br>
        <canvas id="myCanvas" <span class="hcanvas-sec1-hl-green">width="400" height="200"</span>></canvas><br><br>
        /* 💡 JSで2Dコンテキストを取得して描画 */<br>
        <span class="hcanvas-sec1-hl-blue">const</span> cvs = document.getElementById(<span class="hcanvas-sec1-hl-red">'myCanvas'</span>);<br>
        <span class="hcanvas-sec1-hl-blue">const</span> ctx = cvs.<span class="hcanvas-sec1-hl-green">getContext('2d')</span>; <span class="hcanvas-sec1-hl-comment">// 2D描画ツールを取得</span><br><br>
        <span class="hcanvas-sec1-hl-comment">// 赤い四角形を描く</span><br>
        ctx.fillStyle = <span class="hcanvas-sec1-hl-red">'red'</span>;<br>
        ctx.fillRect(50, 50, 100, 100);
      </div>
    </div>
  </div>
</div>
CSSコード表示
.hcanvas-sec1-wrapper {
  background-color: #f8f9fa;
  padding: 20px;
  border: 1px solid #dee2e6;
  border-radius: 4px;
  font-family: sans-serif;
}

.hcanvas-sec1-demo-area {
  display: flex;
  justify-content: center;
}

.hcanvas-sec1-box {
  background-color: #ffffff;
  border: 2px dashed #adb5bd;
  padding: 25px;
  width: 100%;
  max-width: 500px;
  border-radius: 4px;
}

.hcanvas-sec1-label {
  font-size: 15px;
  font-weight: bold;
  margin-bottom: 20px;
  color: #333;
}

.hcanvas-sec1-visual {
  background-color: #f1f3f5;
  padding: 20px;
  border-radius: 8px;
  margin-bottom: 20px;
  border: 1px solid #dee2e6;
}

.hcanvas-sec1-canvas-container {
  display: flex;
  justify-content: center;
  background-image: radial-gradient(#ced4da 1px, transparent 1px);
  background-size: 10px 10px;
  background-color: #e9ecef;
  border: 1px solid #adb5bd;
  border-radius: 4px;
  padding: 10px;
}

.hcanvas-sec1-canvas-element {
  background-color: #fff;
  border: 1px solid #333;
  box-shadow: 0 4px 6px rgba(0,0,0,0.1);
  max-width: 100%; /* スマホ対応 */
  height: auto;
}

.hcanvas-sec1-draw-btn {
  background-color: #0d6efd;
  color: #fff;
  border: none;
  padding: 8px 15px;
  border-radius: 4px;
  font-weight: bold;
  cursor: pointer;
  margin-right: 10px;
}

.hcanvas-sec1-clear-btn {
  background-color: #6c757d;
  color: #fff;
  border: none;
  padding: 8px 15px;
  border-radius: 4px;
  font-weight: bold;
  cursor: pointer;
}

.hcanvas-sec1-code {
  background-color: #282c34;
  color: #abb2bf;
  padding: 15px;
  font-family: monospace;
  font-size: 13px;
  border-radius: 4px;
  line-height: 1.6;
  border-left: 4px solid #198754;
}

.hcanvas-sec1-hl-green {
  color: #98c379;
  font-weight: bold;
}

.hcanvas-sec1-hl-blue {
  color: #61afef;
  font-weight: bold;
}

.hcanvas-sec1-hl-red {
  color: #e06c75;
  font-weight: bold;
}

.hcanvas-sec1-hl-comment {
  color: #6c757d;
  font-style: italic;
}
JavaScriptコード表示
function drawExample() {
  const cvs = document.getElementById('myCanvas');
  const ctx = cvs.getContext('2d');

  // 一旦クリア
  ctx.clearRect(0, 0, cvs.width, cvs.height);

  // 青い四角形
  ctx.fillStyle = '#0d6efd';
  ctx.fillRect(30, 30, 100, 100);

  // 赤い半透明の円
  ctx.beginPath();
  ctx.arc(150, 120, 60, 0, Math.PI * 2);
  ctx.fillStyle = 'rgba(220, 53, 69, 0.8)';
  ctx.fill();

  // テキストの描画
  ctx.font = 'bold 24px sans-serif';
  ctx.fillStyle = '#333';
  ctx.fillText('Canvas 2D!', 220, 100);
}

function clearExample() {
  const cvs = document.getElementById('myCanvas');
  const ctx = cvs.getContext('2d');
  ctx.clearRect(0, 0, cvs.width, cvs.height);
}
SVGやWebGLとの違いと使い分け
ブラウザ上でグラフィックを扱う技術には、Canvasの他に「SVG」と「WebGL」があります。
これらをどう使い分けるかは、パフォーマンスを左右する重要なテーマです。
- SVG
図形がDOMとして存在するため、CSSでホバー効果をつけたり、JavaScriptで特定の図形をクリック判定させたりするのに使用します。
ロゴ、アイコン、インタラクティブな地図など、「要素数が少なく、拡大しても画質を落としたくない」場合に最適です。 - Canvas(2D)
描いた図形はピクセルの集合となるため、クリック判定などは座標計算して実装する手間があります。
しかし、「数千〜数万のオブジェクトを動かすゲームやパーティクル表現」において、パフォーマンスを発揮します。 - WebGL(Canvas 3D)
getContext('webgl')を使用し、PCのGPUを直接叩いて高速描画を行う技術です。
Three.jsなどのライブラリを併用し、「本格的な3Dモデルの表示、Canvas 2Dも処理しきれない高度な演出」に使用します。
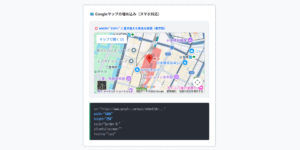
1. Canvas(1枚の画像として処理されるため大量描画に強い)
※JSでピクセルを塗るだけ。描いた後の図形は「ただの絵」になる。
2. SVG(タグとして存在するためCSS等での制御が簡単)
<circle cx=”50″ cy=”50″ r=”40″ />
<rect x=”100″ y=”20″ width=”50″ />
</svg>
【要素数が 100個 の場合】
Canvas : 🟢 快適
SVG : 🟢 快適 (クリックイベント等もつけやすい)
【要素数が 10,000個(パーティクル等) の場合】
Canvas : 🟢 快適 (ピクセルの塗り替えのみなので速い)
SVG : ❌ 激重 (DOMが1万個増えるためブラウザが限界を迎える)
【WebGL(3D/GPU) の出番】
Canvas2Dでも追いつかない数百万のパーティクルや、
Z軸を持つ本格的な3Dモデルを扱う場合は WebGL を使用する。
HTMLコード表示
<div class="hcanvas-diff1-wrapper">

  <div class="hcanvas-diff1-demo-area">
    <div class="hcanvas-diff1-box">
      <div class="hcanvas-diff1-label">⚔️ Canvas(ピクセル) vs SVG(ベクター)</div>

      <div class="hcanvas-diff1-visual">
        <p style="font-size:12px; color:#0d6efd; font-weight:bold; margin:0 0 5px 0;">1. Canvas(1枚の画像として処理されるため大量描画に強い)</p>
        <div class="hcanvas-diff1-mock-canvas">
          <canvas id="cvs"></canvas><br>
          <span style="font-size:11px; color:#666;">※JSでピクセルを塗るだけ。描いた後の図形は「ただの絵」になる。</span>
        </div>

        <p style="font-size:12px; color:#198754; font-weight:bold; margin:20px 0 5px 0;">2. SVG(タグとして存在するためCSS等での制御が簡単)</p>
        <div class="hcanvas-diff1-mock-svg">
          <div style="font-family:monospace; font-size:12px; color:#198754;">
            <svg><br>
              <circle cx="50" cy="50" r="40" /><br>
              <rect x="100" y="20" width="50" /><br>
            </svg>
          </div>
          <span style="font-size:11px; color:#666; display:block; margin-top:5px;">※図形一つ一つがDOM要素。多すぎるとブラウザが重くなる。</span>
        </div>
      </div>

      <div class="hcanvas-diff1-code">
        /* 💡 Canvas vs SVG のパフォーマンステスト目安 */<br><br>
        <span class="hcanvas-diff1-hl-comment">【要素数が 100個 の場合】</span><br>
        Canvas : 🟢 快適<br>
        SVG    : 🟢 快適 (クリックイベント等もつけやすい)<br><br>
        <span class="hcanvas-diff1-hl-comment">【要素数が 10,000個(パーティクル等) の場合】</span><br>
        Canvas : 🟢 快適 (ピクセルの塗り替えのみなので速い)<br>
        SVG    : ❌ 激重 (DOMが1万個増えるためブラウザが限界を迎える)<br><br>
        <span class="hcanvas-diff1-hl-comment">【WebGL(3D/GPU) の出番】</span><br>
        Canvas2Dでも追いつかない数百万のパーティクルや、<br>
        Z軸を持つ本格的な3Dモデルを扱う場合は WebGL を使用する。
      </div>
    </div>
  </div>
</div>
CSSコード表示
.hcanvas-diff1-wrapper {
  background-color: #f8f9fa;
  padding: 20px;
  border: 1px solid #dee2e6;
  border-radius: 4px;
  font-family: sans-serif;
}

.hcanvas-diff1-demo-area {
  display: flex;
  justify-content: center;
}

.hcanvas-diff1-box {
  background-color: #ffffff;
  border: 2px dashed #adb5bd;
  padding: 25px;
  width: 100%;
  max-width: 500px;
  border-radius: 4px;
}

.hcanvas-diff1-label {
  font-size: 15px;
  font-weight: bold;
  margin-bottom: 20px;
  color: #333;
}

.hcanvas-diff1-visual {
  background-color: #f1f3f5;
  padding: 20px;
  border-radius: 8px;
  margin-bottom: 20px;
  border: 1px solid #dee2e6;
}

.hcanvas-diff1-mock-canvas {
  background-color: #fff;
  border: 2px solid #0d6efd;
  padding: 15px;
  border-radius: 4px;
  font-family: monospace;
  font-weight: bold;
  color: #0d6efd;
  box-shadow: 0 2px 4px rgba(0,0,0,0.05);
}

.hcanvas-diff1-mock-svg {
  background-color: #fff;
  border: 2px dashed #198754;
  padding: 15px;
  border-radius: 4px;
  box-shadow: 0 2px 4px rgba(0,0,0,0.05);
}

.hcanvas-diff1-code {
  background-color: #282c34;
  color: #abb2bf;
  padding: 15px;
  font-family: monospace;
  font-size: 13px;
  border-radius: 4px;
  line-height: 1.6;
  border-left: 4px solid #dc3545;
}

.hcanvas-diff1-hl-comment {
  color: #e5c07b;
  font-weight: bold;
}
Canvasのサイズ設定とレスポンシブ対応
HTMLのCanvasを扱う上で、つまずきやすいのが「サイズ設定」と「解像度の問題」です。
通常のHTML要素(<img>や<div>)であれば、CSSで幅と高さを指定するだけできれいに表示されますが、Canvasには「見た目のサイズ」と「描画領域のピクセル数」という2つの概念が存在します。
ここを正しく理解しないと、描いた図形がぼやけたり、画面幅に合わせて伸縮した際に歪んでしまいます。
ここでは、スマホ対応におけるレスポンシブ化、Retinaディスプレイでの「ぼやけ」を解消する実装を解説します。
- 幅と高さの指定と100%表示
- 高解像度ディスプレイでぼやける問題の解消
- CSSを使った中央寄せやレイアウト・背景色の調整
幅と高さの指定と100%表示
Canvasを画面幅いっぱいに広げたい場合やスマホの画面サイズに合わせて伸縮させたい場合の設定方法です。
Canvasを画面に合わせて動的にリサイズするには、見た目を100%にするだけでなく、JavaScriptを使って画面サイズを取得し、Canvasタグのwidthとheight属性のピクセル数を書き換える処理が必須です。
⭕️ JavaScriptで実際のピクセル数も更新する
※画面幅が変わると、JSが画用紙のサイズ自体を計算し直します。
<div id=”wrap”>
<canvas id=”myCanvas”></canvas>
</div>
/* CSS */
#myCanvas {
width: 100%; /* 見た目を100%に */
height: 100%;
}
/* 💡 JS(画面リサイズ時に画用紙のピクセルを合わせる) */
function resize() {
const cvs = document.getElementById(‘myCanvas’);
const wrap = document.getElementById(‘wrap’);
// 親要素のピクセル数をCanvasの属性にセット
cvs.width = wrap.clientWidth;
cvs.height = wrap.clientHeight;
// (※この後に再描画処理を呼ぶ必要があります)
}
window.addEventListener(‘resize’, resize);
HTMLコード表示
<div class="hcanvas-size1-wrapper">

  <div class="hcanvas-size1-demo-area">
    <div class="hcanvas-size1-box">
      <div class="hcanvas-size1-label">📐 画面幅に合わせてリサイズするCanvas</div>

      <div class="hcanvas-size1-visual">
        <p style="font-size:12px; color:#198754; font-weight:bold; margin:0 0 5px 0;">⭕️ JavaScriptで実際のピクセル数も更新する</p>

        <div id="canvasWrapper1" class="hcanvas-size1-container">
          <canvas id="responsiveCanvas" class="hcanvas-size1-canvas"></canvas>
        </div>
        <p style="font-size:11px; color:#666; margin-top:5px; text-align:center;">※画面幅が変わると、JSが画用紙のサイズ自体を計算し直します。</p>
      </div>

      <div class="hcanvas-size1-code">
        <!-- HTML --><br>
        <span class="hcanvas-size1-hl-blue"><div id="wrap"></span><br>
          <canvas id="myCanvas"></canvas><br>
        <span class="hcanvas-size1-hl-blue"></div></span><br><br>
        /* CSS */<br>
        <span class="hcanvas-size1-hl-blue">#myCanvas</span> {<br>
          <span class="hcanvas-size1-hl-green">width: 100%;</span> /* 見た目を100%に */<br>
          <span class="hcanvas-size1-hl-green">height: 100%;</span><br>
        }<br><br>
        /* 💡 JS(画面リサイズ時に画用紙のピクセルを合わせる) */<br>
        <span class="hcanvas-size1-hl-blue">function</span> resize() {<br>
          const cvs = document.getElementById(<span class="hcanvas-size1-hl-red">'myCanvas'</span>);<br>
          const wrap = document.getElementById(<span class="hcanvas-size1-hl-red">'wrap'</span>);<br>
          <span class="hcanvas-size1-hl-comment">// 親要素のピクセル数をCanvasの属性にセット</span><br>
          <span class="hcanvas-size1-hl-green">cvs.width = wrap.clientWidth;</span><br>
          <span class="hcanvas-size1-hl-green">cvs.height = wrap.clientHeight;</span><br>
          <span class="hcanvas-size1-hl-comment">// (※この後に再描画処理を呼ぶ必要があります)</span><br>
        }<br>
        <span class="hcanvas-size1-hl-green">window.addEventListener('resize', resize);</span>
      </div>
    </div>
  </div>
</div>
CSSコード表示
.hcanvas-size1-wrapper {
  background-color: #f8f9fa;
  padding: 20px;
  border: 1px solid #dee2e6;
  border-radius: 4px;
  font-family: sans-serif;
}

.hcanvas-size1-demo-area {
  display: flex;
  justify-content: center;
}

.hcanvas-size1-box {
  background-color: #ffffff;
  border: 2px dashed #adb5bd;
  padding: 25px;
  width: 100%;
  max-width: 500px;
  border-radius: 4px;
}

.hcanvas-size1-label {
  font-size: 15px;
  font-weight: bold;
  margin-bottom: 20px;
  color: #333;
}

.hcanvas-size1-visual {
  background-color: #f1f3f5;
  padding: 20px;
  border-radius: 8px;
  margin-bottom: 20px;
  border: 1px solid #dee2e6;
}

.hcanvas-size1-container {
  width: 100%;
  height: 150px;
  border: 2px solid #0d6efd;
  background-color: #fff;
  position: relative;
}

/* Canvasの「見た目」をコンテナの100%にする */
.hcanvas-size1-canvas {
  width: 100%;
  height: 100%;
  display: block;
}

.hcanvas-size1-code {
  background-color: #282c34;
  color: #abb2bf;
  padding: 15px;
  font-family: monospace;
  font-size: 13px;
  border-radius: 4px;
  line-height: 1.6;
  border-left: 4px solid #198754;
}

.hcanvas-size1-hl-green {
  color: #98c379;
  font-weight: bold;
}

.hcanvas-size1-hl-blue {
  color: #61afef;
  font-weight: bold;
}

.hcanvas-size1-hl-red {
  color: #e06c75;
  font-weight: bold;
}

.hcanvas-size1-hl-comment {
  color: #6c757d;
  font-style: italic;
}
JavaScriptコード表示
// サンプル用の簡易リサイズ&描画処理
function initResponsiveCanvas() {
  const cvs = document.getElementById('responsiveCanvas');
  const wrap = document.getElementById('canvasWrapper1');
  if(!cvs || !wrap) return;
  const ctx = cvs.getContext('2d');

  function resizeAndDraw() {
    // 1. 画用紙のピクセル数を親に合わせる
    cvs.width = wrap.clientWidth;
    cvs.height = wrap.clientHeight;

    // 2. 図形を描く(リサイズされるたびに描画し直す必要がある)
    ctx.clearRect(0, 0, cvs.width, cvs.height);

    // 中央に円を描く
    ctx.beginPath();
    ctx.arc(cvs.width / 2, cvs.height / 2, 40, 0, Math.PI * 2);
    ctx.fillStyle = '#0d6efd';
    ctx.fill();

    // バツ印を描く(歪んでいないかの確認用)
    ctx.beginPath();
    ctx.moveTo(0, 0);
    ctx.lineTo(cvs.width, cvs.height);
    ctx.moveTo(cvs.width, 0);
    ctx.lineTo(0, cvs.height);
    ctx.strokeStyle = 'rgba(0,0,0,0.2)';
    ctx.lineWidth = 2;
    ctx.stroke();
  }

  window.addEventListener('resize', resizeAndDraw);
  resizeAndDraw(); // 初回実行
}
// 実行
setTimeout(initResponsiveCanvas, 100);幅と高さの指定方法を詳しく知りたい人は「【html&css】width(横幅)とheight(高さ)の指定とボックスモデル」を一読ください。
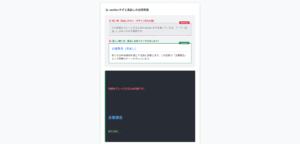
高解像度ディスプレイでぼやける問題の解消
iPhoneなどのスマートフォンやMacのRetinaディスプレイでCanvasを表示すると、描いた文字や図形がどうしてもピンボケしたようにぼやけてしまう現象が起きます。
ぼやけを解消するには、デバイスのピクセル比(window.devicePixelRatio)を取得し、画用紙のピクセル数を2倍に拡大してから、CSSで半分のサイズに圧縮して表示するテクニックが必須です。
※ドット絵のような表現を作りたい場合は、ぼかし処理を無効化するctx.imageSmoothingEnabled = false;を使用します。
❌ 対策なし
⭕️ Retina対応
※スマホやMacで見た際、文字や円のフチの滑らかさに圧倒的な差が出ます。
const cvs = document.getElementById(‘retinaCvs’);
const ctx = cvs.getContext(‘2d’);
// 1. 見た目のサイズを決める
const width = 200;
const height = 100;
// 2. デバイスのピクセル比を取得(スマホ等なら2や3になる)
const dpr = window.devicePixelRatio || 1;
// 3. 画用紙のピクセル数を2倍(等)に増やす!
cvs.width = width * dpr;
cvs.height = height * dpr;
// 4. CSSで見た目のサイズを元のサイズにギュッと圧縮する!
cvs.style.width = width + ‘px’;
cvs.style.height = height + ‘px’;
// 5. 描画座標がズレないようにスケールを合わせる
ctx.scale(dpr, dpr);
HTMLコード表示
<div class="hcanvas-size2-wrapper">

  <div class="hcanvas-size2-demo-area">
    <div class="hcanvas-size2-box">
      <div class="hcanvas-size2-label">🔍 Retina(高解像度)でぼやける問題の解決</div>

      <div class="hcanvas-size2-visual">
        <div style="display:flex; gap:15px; justify-content:center;">
          <div style="text-align:center;">
            <p style="font-size:11px; color:#dc3545; font-weight:bold; margin:0 0 5px 0;">❌ 対策なし</p>
            <canvas id="blurryCanvas" class="hcanvas-size2-canvas-mock"></canvas>
          </div>

          <div style="text-align:center;">
            <p style="font-size:11px; color:#198754; font-weight:bold; margin:0 0 5px 0;">⭕️ Retina対応</p>
            <canvas id="retinaCanvas" class="hcanvas-size2-canvas-mock"></canvas>
          </div>
        </div>
        <p style="font-size:11px; color:#666; margin-top:10px; text-align:center;">※スマホやMacで見た際、文字や円のフチの滑らかさに圧倒的な差が出ます。</p>
      </div>

      <div class="hcanvas-size2-code">
        /* 💡 Retinaディスプレイ対応の必須コード */<br>
        <span class="hcanvas-size2-hl-blue">const</span> cvs = document.getElementById('retinaCvs');<br>
        <span class="hcanvas-size2-hl-blue">const</span> ctx = cvs.getContext('2d');<br><br>
        <span class="hcanvas-size2-hl-comment">// 1. 見た目のサイズを決める</span><br>
        <span class="hcanvas-size2-hl-blue">const</span> width = 200;<br>
        <span class="hcanvas-size2-hl-blue">const</span> height = 100;<br><br>
        <span class="hcanvas-size2-hl-comment">// 2. デバイスのピクセル比を取得(スマホ等なら2や3になる)</span><br>
        <span class="hcanvas-size2-hl-blue">const</span> dpr = <span class="hcanvas-size2-hl-green">window.devicePixelRatio</span> || 1;<br><br>
        <span class="hcanvas-size2-hl-comment">// 3. 画用紙のピクセル数を2倍(等)に増やす!</span><br>
        cvs.width = width * dpr;<br>
        cvs.height = height * dpr;<br><br>
        <span class="hcanvas-size2-hl-comment">// 4. CSSで見た目のサイズを元のサイズにギュッと圧縮する!</span><br>
        <span class="hcanvas-size2-hl-green">cvs.style.width = width + 'px';</span><br>
        <span class="hcanvas-size2-hl-green">cvs.style.height = height + 'px';</span><br><br>
        <span class="hcanvas-size2-hl-comment">// 5. 描画座標がズレないようにスケールを合わせる</span><br>
        ctx.<span class="hcanvas-size2-hl-green">scale(dpr, dpr)</span>;
      </div>
    </div>
  </div>
</div>
CSSコード表示
.hcanvas-size2-wrapper {
  background-color: #f8f9fa;
  padding: 20px;
  border: 1px solid #dee2e6;
  border-radius: 4px;
  font-family: sans-serif;
}

.hcanvas-size2-demo-area {
  display: flex;
  justify-content: center;
}

.hcanvas-size2-box {
  background-color: #ffffff;
  border: 2px dashed #adb5bd;
  padding: 25px;
  width: 100%;
  max-width: 550px;
  border-radius: 4px;
}

.hcanvas-size2-label {
  font-size: 15px;
  font-weight: bold;
  margin-bottom: 20px;
  color: #333;
}

.hcanvas-size2-visual {
  background-color: #f1f3f5;
  padding: 20px;
  border-radius: 8px;
  margin-bottom: 20px;
  border: 1px solid #dee2e6;
}

.hcanvas-size2-canvas-mock {
  background-color: #fff;
  border: 1px solid #adb5bd;
  border-radius: 4px;
}

.hcanvas-size2-code {
  background-color: #282c34;
  color: #abb2bf;
  padding: 15px;
  font-family: monospace;
  font-size: 13px;
  border-radius: 4px;
  line-height: 1.6;
  border-left: 4px solid #0d6efd;
}

.hcanvas-size2-hl-green {
  color: #98c379;
  font-weight: bold;
}

.hcanvas-size2-hl-blue {
  color: #61afef;
  font-weight: bold;
}

.hcanvas-size2-hl-comment {
  color: #6c757d;
  font-style: italic;
}
JavaScriptコード表示
function initRetinaCanvas() {
  const badCvs = document.getElementById('blurryCanvas');
  const goodCvs = document.getElementById('retinaCanvas');
  if(!badCvs || !goodCvs) return;

  const w = 150;
  const h = 80;
  const text = "Canvas 2D";

  // ❌ 悪い例(そのまま)
  badCvs.width = w;
  badCvs.height = h;
  badCvs.style.width = w + 'px';
  badCvs.style.height = h + 'px';
  const badCtx = badCvs.getContext('2d');
  badCtx.fillStyle = '#dc3545';
  badCtx.beginPath();
  badCtx.arc(30, 40, 20, 0, Math.PI*2);
  badCtx.fill();
  badCtx.fillStyle = '#333';
  badCtx.font = 'bold 16px sans-serif';
  badCtx.fillText(text, 60, 45);

  // ⭕️ 良い例(Retina対応)
  // 意図的に違いを見せるため、dprを強制的に高めに設定する(通常は window.devicePixelRatio)
  const dpr = Math.max(window.devicePixelRatio || 1, 2);

  goodCvs.width = w * dpr;
  goodCvs.height = h * dpr;
  goodCvs.style.width = w + 'px';
  goodCvs.style.height = h + 'px';

  const goodCtx = goodCvs.getContext('2d');
  goodCtx.scale(dpr, dpr); // スケールを合わせる

  goodCtx.fillStyle = '#198754';
  goodCtx.beginPath();
  goodCtx.arc(30, 40, 20, 0, Math.PI*2);
  goodCtx.fill();
  goodCtx.fillStyle = '#333';
  goodCtx.font = 'bold 16px sans-serif';
  goodCtx.fillText(text, 60, 45);
}
setTimeout(initRetinaCanvas, 100);
CSSを使った中央寄せやレイアウト・背景色の調整
canvasタグもHTMLの要素の一つであるため、余白や配置・背景色といった見た目のスタイリングはCSSで行うのが一般的です。
- 中央寄せ
CanvasをCSSでdisplay: block;に変更してからmargin: 0 auto;を適用します。 - 背景色
サイトに馴染ませる背景色はCSSでbackground-color: #fff;と指定すればOKです。
ただし、「画像として保存」する機能を作る場合は、CSSの背景色は保存されないため、JavaScript側でctx.fillRect()を使って最初に白の背景を塗りつぶす必要があります。
⭕️ block化して中央寄せし、背景を透けさせる
Canvasの後ろにある文字
canvas {
display: block; /* ★インラインからブロックに変更する! */
margin: 0 auto; /* ★これで中央に寄る */
}
/* 💡 背景色の扱い */
.transparent-cvs {
/* Canvasはデフォルトで背景が透明(transparent) */
background-color: transparent;
border: 2px dashed #0d6efd;
}
HTMLコード表示
<div class="hcanvas-size3-wrapper">

  <div class="hcanvas-size3-demo-area">
    <div class="hcanvas-size3-box">
      <div class="hcanvas-size3-label">🎯 CSSでの中央寄せと背景透過(レイアウト)</div>

      <div class="hcanvas-size3-visual">
        <p style="font-size:12px; color:#198754; font-weight:bold; margin:0 0 5px 0;">⭕️ block化して中央寄せし、背景を透けさせる</p>

        <div class="hcanvas-size3-layout-container">
          <p style="text-align:center; color:#999; margin-top:20px;">Canvasの後ろにある文字</p>

          <canvas id="layoutCanvas" width="200" height="100" class="hcanvas-size3-layout-canvas"></canvas>
        </div>
      </div>

      <div class="hcanvas-size3-code">
        /* 💡 中央寄せにする必須のCSS */<br>
        <span class="hcanvas-size3-hl-blue">canvas</span> {<br>
          <span class="hcanvas-size3-hl-green">display: block;</span>   /* ★インラインからブロックに変更する! */<br>
          <span class="hcanvas-size3-hl-green">margin: 0 auto;</span>   /* ★これで中央に寄る */<br>
        }<br><br>
        /* 💡 背景色の扱い */<br>
        <span class="hcanvas-size3-hl-blue">.transparent-cvs</span> {<br>
          <span class="hcanvas-size3-hl-comment">/* Canvasはデフォルトで背景が透明(transparent) */</span><br>
          <span class="hcanvas-size3-hl-green">background-color: transparent;</span><br>
          border: 2px dashed #0d6efd;<br>
        }
      </div>
    </div>
  </div>
</div>
CSSコード表示
.hcanvas-size3-wrapper {
  background-color: #f8f9fa;
  padding: 20px;
  border: 1px solid #dee2e6;
  border-radius: 4px;
  font-family: sans-serif;
}

.hcanvas-size3-demo-area {
  display: flex;
  justify-content: center;
}

.hcanvas-size3-box {
  background-color: #ffffff;
  border: 2px dashed #adb5bd;
  padding: 25px;
  width: 100%;
  max-width: 500px;
  border-radius: 4px;
}

.hcanvas-size3-label {
  font-size: 15px;
  font-weight: bold;
  margin-bottom: 20px;
  color: #333;
}

.hcanvas-size3-visual {
  background-color: #f1f3f5;
  padding: 20px;
  border-radius: 8px;
  margin-bottom: 20px;
  border: 1px solid #dee2e6;
}

.hcanvas-size3-layout-container {
  width: 100%;
  height: 160px;
  background-color: #e2e8f0;
  /* ストライプ模様の背景 */
  background-image: repeating-linear-gradient(
    45deg,
    transparent,
    transparent 10px,
    #cbd5e1 10px,
    #cbd5e1 20px
  );
  border: 1px solid #adb5bd;
  border-radius: 4px;
  position: relative;
  overflow: hidden;
}

.hcanvas-size3-layout-canvas {
  display: block;      /* ★中央寄せに必須 */
  margin: -10px auto 0; /* ★中央寄せ */
  background-color: transparent; /* ★背景は透明 */
  border: 2px dashed #0d6efd;
  box-shadow: 0 4px 8px rgba(0,0,0,0.2);
}

.hcanvas-size3-code {
  background-color: #282c34;
  color: #abb2bf;
  padding: 15px;
  font-family: monospace;
  font-size: 13px;
  border-radius: 4px;
  line-height: 1.6;
  border-left: 4px solid #198754;
}

.hcanvas-size3-hl-green {
  color: #98c379;
  font-weight: bold;
}

.hcanvas-size3-hl-blue {
  color: #61afef;
  font-weight: bold;
}

.hcanvas-size3-hl-comment {
  color: #6c757d;
  font-style: italic;
}
JavaScriptコード表示
function initLayoutCanvas() {
  const cvs = document.getElementById('layoutCanvas');
  if(!cvs) return;
  const ctx = cvs.getContext('2d');

  // 背景は透明のまま、図形だけを描く
  ctx.fillStyle = 'rgba(13, 110, 253, 0.8)';
  ctx.beginPath();
  ctx.arc(100, 50, 30, 0, Math.PI * 2);
  ctx.fill();

  ctx.fillStyle = '#fff';
  ctx.font = 'bold 12px sans-serif';
  ctx.fillText('透過OK', 80, 54);
}
setTimeout(initLayoutCanvas, 100);displayプロパティの使い方を詳しく知りたい人は「【html&css】displayの種類は?flexやinline-blockの違い」を一読ください。
図形・線・テキストの描き方
Canvasを利用して画面に絵を描くには、JavaScriptを使用して2Dコンテキストから様々な描画メソッドを呼び出します。
ここでは、Canvasを使って図形や線を引く具体的なコード、実務で使うプロパティについて解説します。
- 四角形・円・多角形を描く
- 直線と曲線を引く
- 色・枠線・透明度の設定
- テキストの挿入とフォントサイズの調整
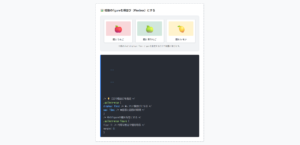
四角形・円・多角形を描く
Canvasの基本は、四角形や円といった図形の描画です。
新しい図形や線を描き始める前には、ctx.beginPath()を呼び出してパスをリセットします。
- 四角形
四角形だけは特別で、ctx.fillRect()を使えばbeginPath()なしで独立して塗りつぶし四角形を描けます。 - 円・楕円
ctx.arc()や楕円を描くctx.ellipse()、角丸を描くctx.arcTo()を使用します。 - 多角形
Canvasに「三角形」や「多角形」を描く専用のメソッドはありません。
線を結んで自作する必要があります。
/* 💡 1. 四角形 (fillRect) */
ctx.fillStyle = ‘#0d6efd’;
ctx.fillRect(30, 40, 80, 80); /* x, y, width, height */
/* 💡 2. 円 (arc) */
ctx.beginPath(); /* ★必須:パスのリセット */
ctx.arc(200, 80, 40, 0, Math.PI * 2); /* x, y, 半径, 開始角, 終了角 */
ctx.fillStyle = ‘#198754’;
ctx.fill(); /* 塗りつぶす */
/* 💡 3. 多角形(線を結んで作る) */
ctx.beginPath();
ctx.moveTo(350, 40); /* 頂点へ移動 */
ctx.lineTo(310, 120); /* 左下へ線を引く */
ctx.lineTo(390, 120); /* 右下へ線を引く */
ctx.closePath(); /* 始点と結んで閉じる */
ctx.fillStyle = ‘#ffc107’;
ctx.fill();
HTMLコード表示
<div class="hcanvas-draw1-wrapper">
  <div class="hcanvas-draw1-demo-area">
    <div class="hcanvas-draw1-box">
      <div class="hcanvas-draw1-label">🟢 図形(四角形・円・多角形)の描画</div>

      <div class="hcanvas-draw1-visual">
        <canvas id="shapesCanvas" width="450" height="150" class="hcanvas-draw1-canvas"></canvas>
      </div>

      <div class="hcanvas-draw1-code">
        const ctx = cvs.getContext('2d');<br><br>
        /* 💡 1. 四角形 (fillRect) */<br>
        <span class="hcanvas-draw1-hl-green">ctx.fillStyle</span> = '#0d6efd';<br>
        <span class="hcanvas-draw1-hl-blue">ctx.fillRect(30, 40, 80, 80);</span> /* x, y, width, height */<br><br>
        /* 💡 2. 円 (arc) */<br>
        <span class="hcanvas-draw1-hl-red">ctx.beginPath();</span> /* ★必須:パスのリセット */<br>
        <span class="hcanvas-draw1-hl-blue">ctx.arc(200, 80, 40, 0, Math.PI * 2);</span> /* x, y, 半径, 開始角, 終了角 */<br>
        ctx.fillStyle = '#198754';<br>
        <span class="hcanvas-draw1-hl-green">ctx.fill();</span> /* 塗りつぶす */<br><br>
        /* 💡 3. 多角形(線を結んで作る) */<br>
        <span class="hcanvas-draw1-hl-red">ctx.beginPath();</span><br>
        ctx.moveTo(350, 40);  /* 頂点へ移動 */<br>
        ctx.lineTo(310, 120); /* 左下へ線を引く */<br>
        ctx.lineTo(390, 120); /* 右下へ線を引く */<br>
        ctx.closePath();      /* 始点と結んで閉じる */<br>
        ctx.fillStyle = '#ffc107';<br>
        ctx.fill();
      </div>
    </div>
  </div>
</div>
CSSコード表示
.hcanvas-draw1-wrapper {
  background-color: #f8f9fa;
  padding: 20px;
  border: 1px solid #dee2e6;
  border-radius: 4px;
  font-family: sans-serif;
}

.hcanvas-draw1-demo-area {
  display: flex;
  justify-content: center;
}

.hcanvas-draw1-box {
  background-color: #ffffff;
  border: 2px dashed #adb5bd;
  padding: 25px;
  width: 100%;
  max-width: 550px;
  border-radius: 4px;
}

.hcanvas-draw1-label {
  font-size: 15px;
  font-weight: bold;
  margin-bottom: 20px;
  color: #333;
}

.hcanvas-draw1-visual {
  background-color: #e9ecef;
  padding: 15px;
  border-radius: 8px;
  margin-bottom: 20px;
  display: flex;
  justify-content: center;
}

.hcanvas-draw1-canvas {
  background-color: #fff;
  border: 1px solid #adb5bd;
  border-radius: 4px;
  max-width: 100%;
}

.hcanvas-draw1-code {
  background-color: #282c34;
  color: #abb2bf;
  padding: 15px;
  font-family: monospace;
  font-size: 13px;
  border-radius: 4px;
  line-height: 1.6;
  border-left: 4px solid #198754;
}

.hcanvas-draw1-hl-green {
  color: #98c379;
  font-weight: bold;
}

.hcanvas-draw1-hl-blue {
  color: #61afef;
  font-weight: bold;
}

.hcanvas-draw1-hl-red {
  color: #e06c75;
  font-weight: bold;
}
JavaScriptコード表示
setTimeout(() => {
  const cvs = document.getElementById('shapesCanvas');
  if(!cvs) return;
  const ctx = cvs.getContext('2d');

  // 1. 四角形
  ctx.fillStyle = '#0d6efd';
  ctx.fillRect(30, 35, 80, 80);

  // 2. 円
  ctx.beginPath();
  ctx.arc(200, 75, 40, 0, Math.PI * 2);
  ctx.fillStyle = '#198754';
  ctx.fill();

  // 3. 多角形(三角形)
  ctx.beginPath();
  ctx.moveTo(350, 35);
  ctx.lineTo(310, 115);
  ctx.lineTo(390, 115);
  ctx.closePath();
  ctx.fillStyle = '#ffc107';
  ctx.fill();
}, 100);
直線と曲線を引く
折れ線グラフやイラストを描く際、直線や曲線を自由に引く技術が求められます。
- パスの開始と移動
ctx.beginPath()で宣言し、ctx.moveTo(x, y)でペンの開始位置を移動させます。 - 線の定義
ctx.lineTo(x, y)で直線を引くか、ctx.bezierCurveTo()で滑らかな曲線を定義します。 - 描画の実行
ctx.stroke()を呼び出して、初めて画面に線が描画されます。
また、点線にしたい場合は事前にctx.setLineDash([5, 5])を設定します。
ctx.beginPath(); /* 1. 下書き開始 */
ctx.moveTo(20, 30); /* 2. ペンを置く */
ctx.lineTo(120, 120); /* 3. 直線を引く(見えない) */
ctx.stroke(); /* 4. インクを落とす(見える) */
/* 💡 2. 点線 (setLineDash) */
ctx.beginPath();
ctx.setLineDash([10, 5]); /* 10px引いて5px空ける */
ctx.moveTo(150, 75);
ctx.lineTo(280, 75);
ctx.stroke();
/* 💡 3. ベジェ曲線 (滑らかな曲線) */
ctx.setLineDash([]); /* 点線をリセット */
ctx.beginPath();
ctx.moveTo(300, 120);
ctx.bezierCurveTo(330, 20, 390, 20, 420, 120);
ctx.stroke();
HTMLコード表示
<div class="hcanvas-draw2-wrapper">
  <div class="hcanvas-draw2-demo-area">
    <div class="hcanvas-draw2-box">
      <div class="hcanvas-draw2-label">〰️ 直線・点線・ベジェ曲線を描く</div>

      <div class="hcanvas-draw2-visual">
        <canvas id="linesCanvas" width="450" height="150" class="hcanvas-draw2-canvas"></canvas>
      </div>

      <div class="hcanvas-draw2-code">
        /* 💡 1. 直線を引く基本ステップ */<br>
        <span class="hcanvas-draw2-hl-red">ctx.beginPath();</span>       /* 1. 下書き開始 */<br>
        <span class="hcanvas-draw2-hl-blue">ctx.moveTo(20, 30);</span>    /* 2. ペンを置く */<br>
        <span class="hcanvas-draw2-hl-blue">ctx.lineTo(120, 120);</span>  /* 3. 直線を引く(見えない) */<br>
        <span class="hcanvas-draw2-hl-green">ctx.stroke();</span>          /* 4. インクを落とす(見える) */<br><br>
        /* 💡 2. 点線 (setLineDash) */<br>
        ctx.beginPath();<br>
        <span class="hcanvas-draw2-hl-blue">ctx.setLineDash([10, 5]);</span> /* 10px引いて5px空ける */<br>
        ctx.moveTo(150, 75);<br>
        ctx.lineTo(280, 75);<br>
        ctx.stroke();<br><br>
        /* 💡 3. ベジェ曲線 (滑らかな曲線) */<br>
        ctx.setLineDash([]); /* 点線をリセット */<br>
        ctx.beginPath();<br>
        ctx.moveTo(300, 120);<br>
        <span class="hcanvas-draw2-hl-blue">ctx.bezierCurveTo(330, 20, 390, 20, 420, 120);</span><br>
        ctx.stroke();
      </div>
    </div>
  </div>
</div>
CSSコード表示
.hcanvas-draw2-wrapper {
  background-color: #f8f9fa;
  padding: 20px;
  border: 1px solid #dee2e6;
  border-radius: 4px;
  font-family: sans-serif;
}

.hcanvas-draw2-demo-area {
  display: flex;
  justify-content: center;
}

.hcanvas-draw2-box {
  background-color: #ffffff;
  border: 2px dashed #adb5bd;
  padding: 25px;
  width: 100%;
  max-width: 550px;
  border-radius: 4px;
}

.hcanvas-draw2-label {
  font-size: 15px;
  font-weight: bold;
  margin-bottom: 20px;
  color: #333;
}

.hcanvas-draw2-visual {
  background-color: #e9ecef;
  padding: 15px;
  border-radius: 8px;
  margin-bottom: 20px;
  display: flex;
  justify-content: center;
}

.hcanvas-draw2-canvas {
  background-color: #fff;
  border: 1px solid #adb5bd;
  border-radius: 4px;
  max-width: 100%;
}

.hcanvas-draw2-code {
  background-color: #282c34;
  color: #abb2bf;
  padding: 15px;
  font-family: monospace;
  font-size: 13px;
  border-radius: 4px;
  line-height: 1.6;
  border-left: 4px solid #198754;
}

.hcanvas-draw2-hl-green {
  color: #98c379;
  font-weight: bold;
}

.hcanvas-draw2-hl-blue {
  color: #61afef;
  font-weight: bold;
}

.hcanvas-draw2-hl-red {
  color: #e06c75;
  font-weight: bold;
}
JavaScriptコード表示
setTimeout(() => {
  const cvs = document.getElementById('linesCanvas');
  if(!cvs) return;
  const ctx = cvs.getContext('2d');

  ctx.lineWidth = 4;
  ctx.strokeStyle = '#333';

  // 1. 直線
  ctx.beginPath();
  ctx.moveTo(30, 30);
  ctx.lineTo(120, 120);
  ctx.stroke();

  // 2. 点線
  ctx.beginPath();
  ctx.setLineDash([10, 5]);
  ctx.moveTo(150, 75);
  ctx.lineTo(280, 75);
  ctx.strokeStyle = '#0d6efd';
  ctx.stroke();

  // 3. ベジェ曲線
  ctx.setLineDash([]); // 点線リセット
  ctx.beginPath();
  ctx.moveTo(310, 120);
  ctx.bezierCurveTo(340, 0, 400, 0, 430, 120);
  ctx.strokeStyle = '#dc3545';
  ctx.stroke();
}, 100);
色・枠線・透明度の設定
図形を描く際、色や枠線をどう設定するかはデザインの要です。
- 塗りつぶしの色
ctx.fillStyleにカラーコード(#fff,rgbaなど)をセットします。 - 枠線の色と太さ
ctx.strokeStyleとctx.lineWidthをセットしてからctx.stroke()を実行します。 - 透明度
色指定でrgba(0, 0, 0, 0.5)のように指定するか、Canvas全体の透明度を一括で変えるctx.globalAlpha = 0.5;を使用します。
/* 💡 1. 枠線の色と太さの設定 */
ctx.lineWidth = 10; /* 太さを10pxにセット */
ctx.strokeStyle = ‘blue’; /* 線の色をセット */
ctx.strokeRect(20, 25, 100, 100); /* ★セットした後に描く */
/* 💡 2. 塗りつぶしの色と透明度(rgba) */
ctx.fillStyle = ‘rgba(220, 53, 69, 0.7)’; /* 赤の半透明 */
ctx.beginPath();
ctx.arc(200, 75, 50, 0, Math.PI*2);
ctx.fill(); /* ★セットした後に塗る */
/* 💡 3. 全体の透明度を一括指定する(globalAlpha) */
ctx.globalAlpha = 0.4; /* 以降に描くものは全て40%の濃さ */
ctx.fillStyle = ‘purple’;
ctx.fillRect(300, 25, 100, 100);
ctx.globalAlpha = 1.0; /* 終わったら元に戻す */
HTMLコード表示
<div class="hcanvas-draw3-wrapper">
  <div class="hcanvas-draw3-demo-area">
    <div class="hcanvas-draw3-box">
      <div class="hcanvas-draw3-label">🎨 色(fill)・枠線(stroke)・透明度(alpha)の設定</div>

      <div class="hcanvas-draw3-visual">
        <canvas id="colorCanvas" width="450" height="150" class="hcanvas-draw3-canvas"></canvas>
      </div>

      <div class="hcanvas-draw3-code">
        /* 💡 1. 枠線の色と太さの設定 */<br>
        <span class="hcanvas-draw3-hl-red">ctx.lineWidth = 10;</span>       /* 太さを10pxにセット */<br>
        <span class="hcanvas-draw3-hl-red">ctx.strokeStyle = 'blue';</span> /* 線の色をセット */<br>
        ctx.strokeRect(20, 25, 100, 100); /* ★セットした後に描く */<br><br>
        /* 💡 2. 塗りつぶしの色と透明度(rgba) */<br>
        <span class="hcanvas-draw3-hl-red">ctx.fillStyle = 'rgba(220, 53, 69, 0.7)';</span> /* 赤の半透明 */<br>
        ctx.beginPath();<br>
        ctx.arc(200, 75, 50, 0, Math.PI*2);<br>
        <span class="hcanvas-draw3-hl-green">ctx.fill();</span> /* ★セットした後に塗る */<br><br>
        /* 💡 3. 全体の透明度を一括指定する(globalAlpha) */<br>
        <span class="hcanvas-draw3-hl-blue">ctx.globalAlpha = 0.4;</span> /* 以降に描くものは全て40%の濃さ */<br>
        ctx.fillStyle = 'purple';<br>
        ctx.fillRect(300, 25, 100, 100);<br>
        <span class="hcanvas-draw3-hl-blue">ctx.globalAlpha = 1.0;</span> /* 終わったら元に戻す */
      </div>
    </div>
  </div>
</div>
CSSコード表示
.hcanvas-draw3-wrapper {
  background-color: #f8f9fa;
  padding: 20px;
  border: 1px solid #dee2e6;
  border-radius: 4px;
  font-family: sans-serif;
}

.hcanvas-draw3-demo-area {
  display: flex;
  justify-content: center;
}

.hcanvas-draw3-box {
  background-color: #ffffff;
  border: 2px dashed #adb5bd;
  padding: 25px;
  width: 100%;
  max-width: 550px;
  border-radius: 4px;
}

.hcanvas-draw3-label {
  font-size: 15px;
  font-weight: bold;
  margin-bottom: 20px;
  color: #333;
}

.hcanvas-draw3-visual {
  background-color: #e9ecef;
  padding: 15px;
  border-radius: 8px;
  margin-bottom: 20px;
  display: flex;
  justify-content: center;
}

.hcanvas-draw3-canvas {
  background-color: #fff;
  border: 1px solid #adb5bd;
  border-radius: 4px;
  max-width: 100%;
}

.hcanvas-draw3-code {
  background-color: #282c34;
  color: #abb2bf;
  padding: 15px;
  font-family: monospace;
  font-size: 13px;
  border-radius: 4px;
  line-height: 1.6;
  border-left: 4px solid #198754;
}

.hcanvas-draw3-hl-green {
  color: #98c379;
  font-weight: bold;
}

.hcanvas-draw3-hl-blue {
  color: #61afef;
  font-weight: bold;
}

.hcanvas-draw3-hl-red {
  color: #e06c75;
  font-weight: bold;
}
JavaScriptコード表示
setTimeout(() => {
  const cvs = document.getElementById('colorCanvas');
  if(!cvs) return;
  const ctx = cvs.getContext('2d');

  // 1. 枠線の色と太さ
  ctx.lineWidth = 10;
  ctx.strokeStyle = '#0d6efd'; // blue
  ctx.strokeRect(30, 25, 100, 100);

  // 2. 塗りつぶしの色と透明度
  ctx.fillStyle = 'rgba(220, 53, 69, 0.8)'; // red, 80% opacity
  ctx.beginPath();
  ctx.arc(200, 75, 50, 0, Math.PI * 2);
  ctx.fill();

  // 重なりを見せるためにもう一つ円
  ctx.fillStyle = 'rgba(25, 135, 84, 0.8)'; // green, 80% opacity
  ctx.beginPath();
  ctx.arc(230, 100, 40, 0, Math.PI * 2);
  ctx.fill();

  // 3. globalAlphaによる全体透明度
  ctx.globalAlpha = 0.4;
  ctx.fillStyle = '#6f42c1'; // purple
  ctx.fillRect(320, 25, 100, 100);
  ctx.globalAlpha = 1.0; // リセット
}, 100);からコードの指定方法を詳しく知りたい人は「【HTML】カラーコードの指定方法:文字色・背景色・透過やツール」を一読ください。
テキストの挿入とフォントサイズの調整
Canvasには図形だけでなく、テキストを直接描画する機能も備わっています。
- テキストの描画
ctx.fillText(文字列, x座標, y座標)を使用します。 - フォント・サイズ・色
描画する前に、ctx.font = '24px Arial'やctx.fillStyleを指定します。 - 位置調整
はみ出しを防ぐため、ctx.textBaseline = 'top';を指定して基準を「文字の上端」に変更するか、Y座標をフォントサイズ分だけ下にずらします。
また、文字を中央に配置したい場合はctx.measureText(文字列).widthで文字幅を計算するかctx.textAlign = 'center';を活用します。
ctx.font = “bold 24px sans-serif”;
ctx.fillStyle = “#333”;
/* 💡 2. ベースラインの罠を回避する */
ctx.textBaseline = “top”; /* 基準を上端にする */
ctx.fillText(“左上に描画”, 10, 10); /* 見切れずに表示される */
/* 💡 3. 文字をCanvasのど真ん中に配置する */
ctx.font = “30px Arial”;
ctx.fillStyle = “#0d6efd”;
ctx.textAlign = “center”; /* X座標を文字の中央にする */
ctx.textBaseline = “middle”; /* Y座標を文字の中央にする */
ctx.fillText(“ど真ん中”, 225, 75); /* Canvasの中心座標を指定 */
HTMLコード表示
<div class="hcanvas-draw4-wrapper">
  <div class="hcanvas-draw4-demo-area">
    <div class="hcanvas-draw4-box">
      <div class="hcanvas-draw4-label">🔤 テキスト(文字)の描画と配置コントロール</div>

      <div class="hcanvas-draw4-visual">
        <canvas id="textCanvas" width="450" height="150" class="hcanvas-draw4-canvas"></canvas>
      </div>

      <div class="hcanvas-draw4-code">
        /* 💡 1. フォントサイズとスタイルの設定 */<br>
        <span class="hcanvas-draw4-hl-red">ctx.font = "bold 24px sans-serif";</span><br>
        ctx.fillStyle = "#333";<br><br>
        /* 💡 2. ベースラインの罠を回避する */<br>
        <span class="hcanvas-draw4-hl-blue">ctx.textBaseline = "top";</span> /* 基準を上端にする */<br>
        <span class="hcanvas-draw4-hl-green">ctx.fillText("左上に描画", 10, 10);</span> /* 見切れずに表示される */<br><br>
        /* 💡 3. 文字をCanvasのど真ん中に配置する */<br>
        ctx.font = "30px Arial";<br>
        ctx.fillStyle = "#0d6efd";<br>
        <span class="hcanvas-draw4-hl-blue">ctx.textAlign = "center";</span> /* X座標を文字の中央にする */<br>
        <span class="hcanvas-draw4-hl-blue">ctx.textBaseline = "middle";</span> /* Y座標を文字の中央にする */<br>
        <span class="hcanvas-draw4-hl-green">ctx.fillText("ど真ん中", 225, 75);</span> /* Canvasの中心座標を指定 */
      </div>
    </div>
  </div>
</div>
CSSコード表示
.hcanvas-draw4-wrapper {
  background-color: #f8f9fa;
  padding: 20px;
  border: 1px solid #dee2e6;
  border-radius: 4px;
  font-family: sans-serif;
}

.hcanvas-draw4-demo-area {
  display: flex;
  justify-content: center;
}

.hcanvas-draw4-box {
  background-color: #ffffff;
  border: 2px dashed #adb5bd;
  padding: 25px;
  width: 100%;
  max-width: 550px;
  border-radius: 4px;
}

.hcanvas-draw4-label {
  font-size: 15px;
  font-weight: bold;
  margin-bottom: 20px;
  color: #333;
}

.hcanvas-draw4-visual {
  background-color: #e9ecef;
  padding: 15px;
  border-radius: 8px;
  margin-bottom: 20px;
  display: flex;
  justify-content: center;
}

.hcanvas-draw4-canvas {
  background-color: #fff;
  border: 1px solid #adb5bd;
  border-radius: 4px;
  max-width: 100%;
  /* 座標確認用の補助線を背景画像で代用 */
  background-image:
    linear-gradient(rgba(0,0,0,0.1) 1px, transparent 1px),
    linear-gradient(90deg, rgba(0,0,0,0.1) 1px, transparent 1px);
  background-size: 100% 75px, 225px 100%;
}

.hcanvas-draw4-code {
  background-color: #282c34;
  color: #abb2bf;
  padding: 15px;
  font-family: monospace;
  font-size: 13px;
  border-radius: 4px;
  line-height: 1.6;
  border-left: 4px solid #198754;
}

.hcanvas-draw4-hl-green {
  color: #98c379;
  font-weight: bold;
}

.hcanvas-draw4-hl-blue {
  color: #61afef;
  font-weight: bold;
}

.hcanvas-draw4-hl-red {
  color: #e06c75;
  font-weight: bold;
}
JavaScriptコード表示
setTimeout(() => {
  const cvs = document.getElementById('textCanvas');
  if(!cvs) return;
  const ctx = cvs.getContext('2d');

  // 1. 左上に描画(ベースライン変更)
  ctx.font = 'bold 20px sans-serif';
  ctx.fillStyle = '#333';
  ctx.textBaseline = 'top';
  ctx.fillText('左上(10,10)', 10, 10);

  // 右下に描画(ベースラインとアライン変更)
  ctx.textAlign = 'right';
  ctx.textBaseline = 'bottom';
  ctx.fillText('右下', 440, 140);

  // 2. ど真ん中に描画
  ctx.font = 'bold 36px Arial';
  ctx.fillStyle = '#0d6efd';
  ctx.textAlign = 'center';
  ctx.textBaseline = 'middle';
  // 450x150 の中心は 225, 75
  ctx.fillText('ど真ん中', 225, 75);
}, 100);フォントサイズの指定方法を詳しく知りたい人は「【HTML】フォントサイズ(文字)の指定:px・rem・em・%の変更と自動調整」を一読ください。
画像の描画とピクセル操作・フィルター
HTMLのCanvasの真骨頂は、図形を描くだけでなく、既存の写真やイラストなどの画像データを読み込んで自由に配置・加工できる点にあります。
ブラウザ上で画像を合成したり、色調を補正したりして画面に出力する技術は、Web上の画像編集ツールやゲーム、さらにはユーザーがアップロードした画像のプレビュー機能などにおいて必須のスキルです。
ここでは、画像の読み込み、ピクセル操作、Photoshopのようなブレンドモードやフィルター機能の活用法まで解説します。
- 画像の読み込みと表示
- ピクセルデータの取得と加工
- 画像の重なりとフィルター
画像の読み込みと表示
Canvasに外部の画像ファイルを追加して描画するには、JavaScriptでImageオブジェクトを作成しdrawImage()メソッドを使用します。
画像をCanvasに描画する際は、img.onload = function() { ... }というイベントリスナーを使用し、「画像の読み込みが完全に終わったタイミング」を待ってからdrawImage()を実行しなければなりません。
⭕️ onloadを待ってから描画する
const ctx = cvs.getContext(‘2d’);
/* 💡 1. Imageオブジェクトを生成 */
const img = new Image();
img.src = ‘sample.jpg’;
/* ❌ 悪い例:読み込みを待たずに描画(何も出ない) */
// ctx.drawImage(img, 0, 0);
/* ⭕️ 良い例:onloadイベントで完了を待つ */
img.onload = function() {
/* 画像, x, y, 幅, 高さ */
ctx.drawImage(img, 20, 20, 100, 100);
};
HTMLコード表示
<div class="hcanvas-img1-wrapper">

  <div class="hcanvas-img1-demo-area">
    <div class="hcanvas-img1-box">
      <div class="hcanvas-img1-label">🖼️ 画像の読み込みと描画(drawImage)</div>

      <div class="hcanvas-img1-visual">
        <p style="font-size:12px; color:#198754; font-weight:bold; margin:0 0 5px 0;">⭕️ onloadを待ってから描画する</p>
        <canvas id="drawImageCanvas" width="450" height="150" class="hcanvas-img1-canvas"></canvas>
      </div>

      <div class="hcanvas-img1-code">
        const cvs = document.getElementById('myCanvas');<br>
        const ctx = cvs.getContext('2d');<br><br>
        /* 💡 1. Imageオブジェクトを生成 */<br>
        <span class="hcanvas-img1-hl-blue">const img = new Image();</span><br>
        img.src = 'sample.jpg';<br><br>
        /* ❌ 悪い例:読み込みを待たずに描画(何も出ない) */<br>
        <span class="hcanvas-img1-hl-comment">// ctx.drawImage(img, 0, 0);</span><br><br>
        /* ⭕️ 良い例:onloadイベントで完了を待つ */<br>
        <span class="hcanvas-img1-hl-green">img.onload = function() {</span><br>
          /* 画像, x, y, 幅, 高さ */<br>
          <span class="hcanvas-img1-hl-blue">ctx.drawImage(img, 20, 20, 100, 100);</span><br>
        <span class="hcanvas-img1-hl-green">};</span>
      </div>
    </div>
  </div>
</div>
CSSコード表示
.hcanvas-img1-wrapper {
  background-color: #f8f9fa;
  padding: 20px;
  border: 1px solid #dee2e6;
  border-radius: 4px;
  font-family: sans-serif;
}

.hcanvas-img1-demo-area {
  display: flex;
  justify-content: center;
}

.hcanvas-img1-box {
  background-color: #ffffff;
  border: 2px dashed #adb5bd;
  padding: 25px;
  width: 100%;
  max-width: 550px;
  border-radius: 4px;
}

.hcanvas-img1-label {
  font-size: 15px;
  font-weight: bold;
  margin-bottom: 20px;
  color: #333;
}

.hcanvas-img1-visual {
  background-color: #e9ecef;
  padding: 15px;
  border-radius: 8px;
  margin-bottom: 20px;
  display: flex;
  flex-direction: column;
  align-items: center;
}

.hcanvas-img1-canvas {
  background-color: #fff;
  border: 1px solid #adb5bd;
  border-radius: 4px;
  max-width: 100%;
}

.hcanvas-img1-code {
  background-color: #282c34;
  color: #abb2bf;
  padding: 15px;
  font-family: monospace;
  font-size: 13px;
  border-radius: 4px;
  line-height: 1.6;
  border-left: 4px solid #198754;
}

.hcanvas-img1-hl-green {
  color: #98c379;
  font-weight: bold;
}

.hcanvas-img1-hl-blue {
  color: #61afef;
  font-weight: bold;
}

.hcanvas-img1-hl-comment {
  color: #6c757d;
  font-style: italic;
}
JavaScriptコード表示
setTimeout(() => {
  const cvs = document.getElementById('drawImageCanvas');
  if(!cvs) return;
  const ctx = cvs.getContext('2d');

  // デモ用に、外部ファイルではなくDataURIで画像を生成して読み込ませます
  const img = new Image();
  // 簡単な青い四角形と星マークの画像をデータとして用意
  img.src = 'data:image/svg+xml;utf8,<svg xmlns="http://www.w3.org/2000/svg" width="100" height="100"><rect width="100" height="100" fill="%230d6efd"/><text x="50" y="65" font-size="50" text-anchor="middle" fill="white">★</text></svg>';

  // ⭕️ onloadで確実にロードを待ってから描画
  img.onload = function() {
    ctx.fillStyle = '#333';
    ctx.font = '14px sans-serif';
    ctx.fillText('↓読み込み完了後に描画', 20, 30);

    // drawImage(image, x, y, width, height)
    ctx.drawImage(img, 20, 40, 90, 90);

    // 別のサイズで複数描画も可能
    ctx.drawImage(img, 150, 40, 50, 50);
  };
}, 100);
ピクセルデータの取得と加工
Canvasに描画された画像は、最終的にRGBA(赤、緑、青、透明度)の数値の羅列になります。
このピクセルデータを直接取得して計算し、画面に戻すことで画像をモノクロにしたり、特定の位置の色をスポイトツールのように取得したりできます。
ピクセル操作(getImageDataとputImageData)を行う場合、読み込む画像は自サイトのサーバーに置かれているものを使用してください。
どうしても外部サーバーの画像を使いたい場合は、画像配信側のサーバーがCORSを許可している前提でJavaScript側でもimg.crossOrigin = "Anonymous";を設定して読み込む必要があります。
⚠️ 外部ドメインの画像はCORSエラーになります
(左)元の画像 / (右)ピクセル計算でモノクロ化
const imgData = ctx.getImageData(0, 0, width, height);
const data = imgData.data; /* [R, G, B, A, R, G, B, A…] の配列 */
/* 💡 2. 1ピクセル(4つの値)ずつループで処理 */
for (let i = 0; i < data.length; i += 4) {
const r = data[i];
const g = data[i + 1];
const b = data[i + 2];
// RGBの平均値を求めてグレーにする
const gray = (r + g + b) / 3;
data[i] = gray; // Red
data[i + 1] = gray; // Green
data[i + 2] = gray; // Blue
}
/* 💡 3. 加工したデータをCanvasに戻す */
ctx.putImageData(imgData, 0, 0);
HTMLコード表示
<div class="hcanvas-img2-wrapper">

  <div class="hcanvas-img2-demo-area">
    <div class="hcanvas-img2-box">
      <div class="hcanvas-img2-label">🧮 ピクセルデータの取得と加工(モノクロ化)</div>

      <div class="hcanvas-img2-visual">
        <p style="font-size:12px; color:#dc3545; font-weight:bold; margin:0 0 5px 0;">⚠️ 外部ドメインの画像はCORSエラーになります</p>
        <div style="display: flex; gap: 10px; align-items: center; justify-content: center;">
          <canvas id="pixelCanvasOriginal" width="100" height="100" class="hcanvas-img2-canvas"></canvas>
          <span style="font-size:20px;">➡️</span>
          <canvas id="pixelCanvasFiltered" width="100" height="100" class="hcanvas-img2-canvas"></canvas>
        </div>
        <p style="text-align:center; font-size:11px; margin-top:5px; color:#666;">(左)元の画像 / (右)ピクセル計算でモノクロ化</p>
      </div>

      <div class="hcanvas-img2-code">
        /* 💡 1. Canvasの全ピクセルデータを取得 */<br>
        <span class="hcanvas-img2-hl-blue">const imgData = ctx.getImageData(0, 0, width, height);</span><br>
        <span class="hcanvas-img2-hl-blue">const data = imgData.data;</span> /* [R, G, B, A, R, G, B, A...] の配列 */<br><br>
        /* 💡 2. 1ピクセル(4つの値)ずつループで処理 */<br>
        <span class="hcanvas-img2-hl-green">for (let i = 0; i < data.length; i += 4) {</span><br>
          const r = data[i];<br>
          const g = data[i + 1];<br>
          const b = data[i + 2];<br>
          <span class="hcanvas-img2-hl-comment">// RGBの平均値を求めてグレーにする</span><br>
          const gray = (r + g + b) / 3;<br>
          data[i] = gray;     <span class="hcanvas-img2-hl-comment">// Red</span><br>
          data[i + 1] = gray; <span class="hcanvas-img2-hl-comment">// Green</span><br>
          data[i + 2] = gray; <span class="hcanvas-img2-hl-comment">// Blue</span><br>
        <span class="hcanvas-img2-hl-green">}</span><br><br>
        /* 💡 3. 加工したデータをCanvasに戻す */<br>
        <span class="hcanvas-img2-hl-red">ctx.putImageData(imgData, 0, 0);</span>
      </div>
    </div>
  </div>
</div>
CSSコード表示
.hcanvas-img2-wrapper {
  background-color: #f8f9fa;
  padding: 20px;
  border: 1px solid #dee2e6;
  border-radius: 4px;
  font-family: sans-serif;
}

.hcanvas-img2-demo-area {
  display: flex;
  justify-content: center;
}

.hcanvas-img2-box {
  background-color: #ffffff;
  border: 2px dashed #adb5bd;
  padding: 25px;
  width: 100%;
  max-width: 550px;
  border-radius: 4px;
}

.hcanvas-img2-label {
  font-size: 15px;
  font-weight: bold;
  margin-bottom: 20px;
  color: #333;
}

.hcanvas-img2-visual {
  background-color: #e9ecef;
  padding: 15px;
  border-radius: 8px;
  margin-bottom: 20px;
}

.hcanvas-img2-canvas {
  background-color: #fff;
  border: 1px solid #adb5bd;
  border-radius: 4px;
}

.hcanvas-img2-code {
  background-color: #282c34;
  color: #abb2bf;
  padding: 15px;
  font-family: monospace;
  font-size: 13px;
  border-radius: 4px;
  line-height: 1.6;
  border-left: 4px solid #dc3545;
}

.hcanvas-img2-hl-green {
  color: #98c379;
  font-weight: bold;
}

.hcanvas-img2-hl-blue {
  color: #61afef;
  font-weight: bold;
}

.hcanvas-img2-hl-red {
  color: #e06c75;
  font-weight: bold;
}

.hcanvas-img2-hl-comment {
  color: #6c757d;
  font-style: italic;
}
JavaScriptコード表示
setTimeout(() => {
  const cvsOrg = document.getElementById('pixelCanvasOriginal');
  const cvsFlt = document.getElementById('pixelCanvasFiltered');
  if(!cvsOrg || !cvsFlt) return;
  const ctxOrg = cvsOrg.getContext('2d');
  const ctxFlt = cvsFlt.getContext('2d');

  // 元の画像(カラー)を生成
  ctxOrg.fillStyle = '#dc3545'; // 赤
  ctxOrg.fillRect(0, 0, 50, 100);
  ctxOrg.fillStyle = '#198754'; // 緑
  ctxOrg.fillRect(50, 0, 50, 100);
  ctxOrg.fillStyle = '#0d6efd'; // 青の円
  ctxOrg.beginPath();
  ctxOrg.arc(50, 50, 30, 0, Math.PI*2);
  ctxOrg.fill();

  // オリジナルからデータを取得(CORSの問題がない同ページ生成データ)
  const imgData = ctxOrg.getImageData(0, 0, 100, 100);
  const data = imgData.data;

  // モノクロ化処理
  for (let i = 0; i < data.length; i += 4) {
    const r = data[i];
    const g = data[i + 1];
    const b = data[i + 2];
    const gray = (r * 0.3) + (g * 0.59) + (b * 0.11); // より自然なグレー計算
    data[i]     = gray;
    data[i + 1] = gray;
    data[i + 2] = gray;
  }

  // フィルター用Canvasに出力
  ctxFlt.putImageData(imgData, 0, 0);
}, 100);
画像の重なりとフィルター
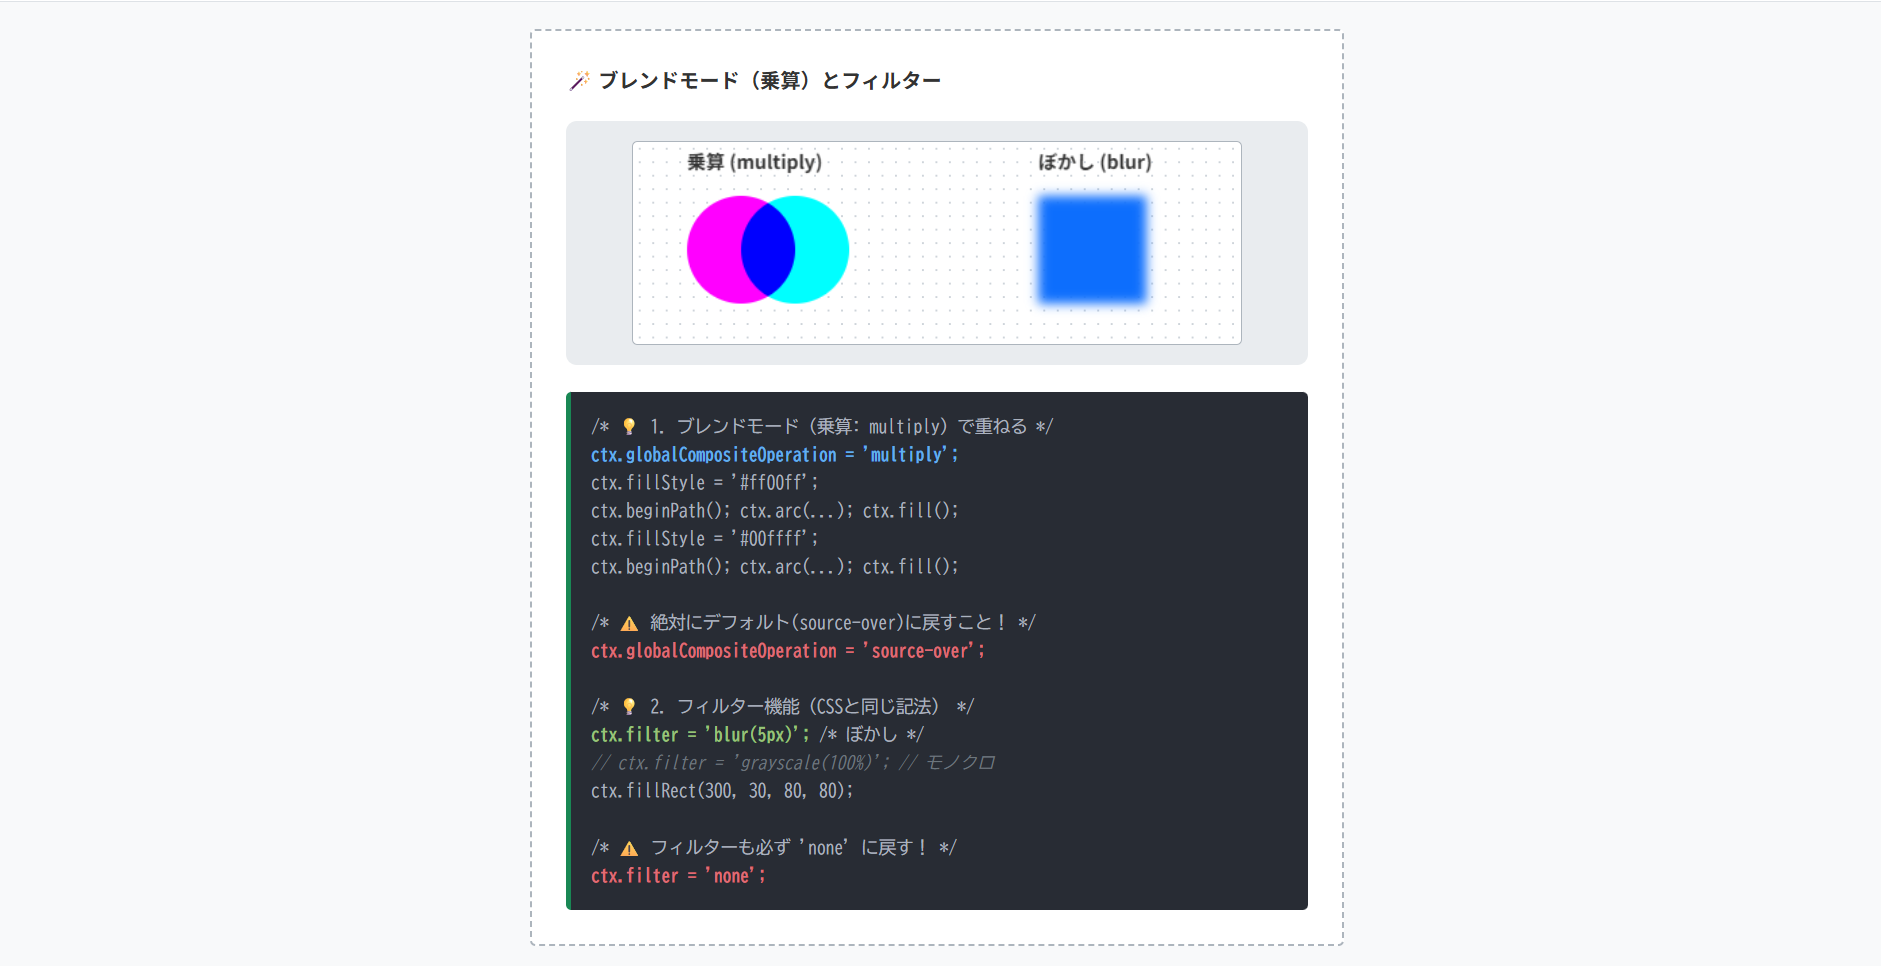
複雑なピクセル計算を自作しなくても、CanvasにはPhotoshopのようなブレンドモードやフィルターが標準で備わっており、画像を重ねて切り抜くマスク処理も可能です。
- ブレンドモード
ctx.globalCompositeOperation = 'multiply';(乗算)などで描画した後は、デフォルトの'source-over'に戻す必要があります。 - フィルター
ctx.filter = 'blur(5px)';でぼかした後は、'none'に戻します。 - 安全な方法
設定を変える直前にctx.save()で状態を保存し、描き終わったらctx.restore()で状態を復元するのが複雑な描画を行う実務標準です。
ctx.globalCompositeOperation = 'multiply';
ctx.fillStyle = '#ff00ff';
ctx.beginPath(); ctx.arc(...); ctx.fill();
ctx.fillStyle = '#00ffff';
ctx.beginPath(); ctx.arc(...); ctx.fill();
/* ⚠️ 絶対にデフォルト(source-over)に戻すこと! */
ctx.globalCompositeOperation = 'source-over';
/* 💡 2. フィルター機能(CSSと同じ記法) */
ctx.filter = 'blur(5px)'; /* ぼかし */
// ctx.filter = 'grayscale(100%)'; // モノクロ
ctx.fillRect(300, 30, 80, 80);
/* ⚠️ フィルターも必ず 'none' に戻す! */
ctx.filter = 'none';
HTMLコード表示
<div class="hcanvas-img3-wrapper">
  <div class="hcanvas-img3-demo-area">
    <div class="hcanvas-img3-box">
      <div class="hcanvas-img3-label">🪄 ブレンドモード(乗算)とフィルター</div>

      <div class="hcanvas-img3-visual">
        <canvas id="blendCanvas" width="450" height="150" class="hcanvas-img3-canvas"></canvas>
      </div>

      <div class="hcanvas-img3-code">
        /* 💡 1. ブレンドモード(乗算: multiply)で重ねる */<br>
        <span class="hcanvas-img3-hl-blue">ctx.globalCompositeOperation = 'multiply';</span><br>
        ctx.fillStyle = '#ff00ff';<br>
        ctx.beginPath(); ctx.arc(...); ctx.fill();<br>
        ctx.fillStyle = '#00ffff';<br>
        ctx.beginPath(); ctx.arc(...); ctx.fill();<br><br>
        /* ⚠️ 絶対にデフォルト(source-over)に戻すこと! */<br>
        <span class="hcanvas-img3-hl-red">ctx.globalCompositeOperation = 'source-over';</span><br><br>
        /* 💡 2. フィルター機能(CSSと同じ記法) */<br>
        <span class="hcanvas-img3-hl-green">ctx.filter = 'blur(5px)';</span>   /* ぼかし */<br>
        <span class="hcanvas-img3-hl-comment">// ctx.filter = 'grayscale(100%)'; // モノクロ</span><br>
        ctx.fillRect(300, 30, 80, 80);<br><br>
        /* ⚠️ フィルターも必ず 'none' に戻す! */<br>
        <span class="hcanvas-img3-hl-red">ctx.filter = 'none';</span>
      </div>
    </div>
  </div>
</div>
CSSコード表示
.hcanvas-img3-wrapper {
  background-color: #f8f9fa;
  padding: 20px;
  border: 1px solid #dee2e6;
  border-radius: 4px;
  font-family: sans-serif;
}

.hcanvas-img3-demo-area {
  display: flex;
  justify-content: center;
}

.hcanvas-img3-box {
  background-color: #ffffff;
  border: 2px dashed #adb5bd;
  padding: 25px;
  width: 100%;
  max-width: 550px;
  border-radius: 4px;
}

.hcanvas-img3-label {
  font-size: 15px;
  font-weight: bold;
  margin-bottom: 20px;
  color: #333;
}

.hcanvas-img3-visual {
  background-color: #e9ecef;
  padding: 15px;
  border-radius: 8px;
  margin-bottom: 20px;
  display: flex;
  justify-content: center;
}

.hcanvas-img3-canvas {
  background-color: #fff;
  border: 1px solid #adb5bd;
  border-radius: 4px;
  max-width: 100%;
  background-image: radial-gradient(#ced4da 1px, transparent 1px);
  background-size: 10px 10px;
}

.hcanvas-img3-code {
  background-color: #282c34;
  color: #abb2bf;
  padding: 15px;
  font-family: monospace;
  font-size: 13px;
  border-radius: 4px;
  line-height: 1.6;
  border-left: 4px solid #198754;
}

.hcanvas-img3-hl-green {
  color: #98c379;
  font-weight: bold;
}

.hcanvas-img3-hl-blue {
  color: #61afef;
  font-weight: bold;
}

.hcanvas-img3-hl-red {
  color: #e06c75;
  font-weight: bold;
}

.hcanvas-img3-hl-comment {
  color: #6c757d;
  font-style: italic;
}
JavaScriptコード表示
setTimeout(() => {
  const cvs = document.getElementById('blendCanvas');
  if(!cvs) return;
  const ctx = cvs.getContext('2d');

  // テキスト
  ctx.fillStyle = '#333';
  ctx.font = 'bold 14px sans-serif';
  ctx.fillText('乗算 (multiply)', 40, 20);
  ctx.fillText('ぼかし (blur)', 300, 20);

  // --- 1. ブレンドモード(乗算) ---
  ctx.globalCompositeOperation = 'multiply';

  // マゼンタの円
  ctx.fillStyle = '#ff00ff';
  ctx.beginPath();
  ctx.arc(80, 80, 40, 0, Math.PI*2);
  ctx.fill();

  // シアンの円(重なった部分が青くなる)
  ctx.fillStyle = '#00ffff';
  ctx.beginPath();
  ctx.arc(120, 80, 40, 0, Math.PI*2);
  ctx.fill();

  // ⚠️ リセット
  ctx.globalCompositeOperation = 'source-over';

  // --- 2. フィルター機能 ---
  ctx.filter = 'blur(4px)';

  ctx.fillStyle = '#0d6efd';
  ctx.fillRect(300, 40, 80, 80);

  // ⚠️ リセット
  ctx.filter = 'none';
}, 100);
Canvasでアニメーションとゲームを作る
HTMLのCanvasは、静的な図形や画像を描画するだけでなく、パラパラ漫画のように連続で絵を描き直すことで滑らかな動きを表現する「アニメーション」の実装に適した技術です。
描画速度の速さとピクセル単位の制御力を活かせば、ブラウザ上で動作する本格的な「ゲーム」を重いプラグインなしで開発できます。
ここでは、アニメーションの基礎となるループ処理、ユーザーの操作(マウス・キーボード)を受け取るインタラクティブな処理、キャラクターやカメラの制御に必須となる座標変換(移動・回転)まで解説します。
requestAnimationFrameを使ったアニメーションループ- マウス・キーボードイベントの取得
- 移動・回転・拡大縮小の実装
requestAnimationFrameを使ったアニメーションループ
Canvasでアニメーションを実装する仕組みは、「1. 画面を消す」→「2. 少し位置をずらして描く」→「3. 繰り返す」というシンプルなパラパラ漫画の原理です。
アニメーションのループ処理には、requestAnimationFrameを使用します。
これは「ブラウザの画面更新に最も適したタイミングで次のフレームを描画する」専用メソッドであり、別のタブを開いている間は自動で処理を一時停止してくれる関数です。
⭕️ requestAnimationFrameで滑らかに動かす
function animate() {
/* 💡 1. まず前のフレームの絵を完全に消す(超重要) */
ctx.clearRect(0, 0, canvas.width, canvas.height);
/* 💡 2. 位置を更新して新しい絵を描く */
x += 2;
ctx.fillStyle = '#0d6efd';
ctx.fillRect(x, 50, 50, 50);
/* 💡 3. 次のフレームの描画をブラウザに予約する */
requestAnimationFrame(animate);
}
// アニメーション開始
animate();
HTMLコード表示
<div class="hcanvas-anim1-wrapper">

  <div class="hcanvas-anim1-demo-area">
    <div class="hcanvas-anim1-box">
      <div class="hcanvas-anim1-label">🎬 アニメーションループの基本構造</div>

      <div class="hcanvas-anim1-visual">
        <p style="font-size:12px; color:#198754; font-weight:bold; margin:0 0 5px 0;">⭕️ requestAnimationFrameで滑らかに動かす</p>
        <canvas id="animLoopCanvas" width="450" height="150" class="hcanvas-anim1-canvas"></canvas>
      </div>

      <div class="hcanvas-anim1-code">
        let x = 0;<br><br>
        <span class="hcanvas-anim1-hl-blue">function</span> animate() {<br>
          /* 💡 1. まず前のフレームの絵を完全に消す(超重要) */<br>
          <span class="hcanvas-anim1-hl-red">ctx.clearRect(0, 0, canvas.width, canvas.height);</span><br><br>
          /* 💡 2. 位置を更新して新しい絵を描く */<br>
          x += 2;<br>
          ctx.fillStyle = '#0d6efd';<br>
          ctx.fillRect(x, 50, 50, 50);<br><br>
          /* 💡 3. 次のフレームの描画をブラウザに予約する */<br>
          <span class="hcanvas-anim1-hl-green">requestAnimationFrame(animate);</span><br>
        }<br><br>
        <span class="hcanvas-anim1-hl-comment">// アニメーション開始</span><br>
        animate();
      </div>
    </div>
  </div>
</div>
CSSコード表示
.hcanvas-anim1-wrapper {
  background-color: #f8f9fa;
  padding: 20px;
  border: 1px solid #dee2e6;
  border-radius: 4px;
  font-family: sans-serif;
}

.hcanvas-anim1-demo-area {
  display: flex;
  justify-content: center;
}

.hcanvas-anim1-box {
  background-color: #ffffff;
  border: 2px dashed #adb5bd;
  padding: 25px;
  width: 100%;
  max-width: 550px;
  border-radius: 4px;
}

.hcanvas-anim1-label {
  font-size: 15px;
  font-weight: bold;
  margin-bottom: 20px;
  color: #333;
}

.hcanvas-anim1-visual {
  background-color: #e9ecef;
  padding: 15px;
  border-radius: 8px;
  margin-bottom: 20px;
  display: flex;
  flex-direction: column;
  align-items: center;
}

.hcanvas-anim1-canvas {
  background-color: #fff;
  border: 1px solid #adb5bd;
  border-radius: 4px;
  max-width: 100%;
}

.hcanvas-anim1-code {
  background-color: #282c34;
  color: #abb2bf;
  padding: 15px;
  font-family: monospace;
  font-size: 13px;
  border-radius: 4px;
  line-height: 1.6;
  border-left: 4px solid #198754;
}

.hcanvas-anim1-hl-green {
  color: #98c379;
  font-weight: bold;
}

.hcanvas-anim1-hl-blue {
  color: #61afef;
  font-weight: bold;
}

.hcanvas-anim1-hl-red {
  color: #e06c75;
  font-weight: bold;
}

.hcanvas-anim1-hl-comment {
  color: #6c757d;
  font-style: italic;
}
JavaScriptコード表示
setTimeout(() => {
  const cvs = document.getElementById('animLoopCanvas');
  if(!cvs) return;
  const ctx = cvs.getContext('2d');

  let x = 0;
  let speed = 3;

  function loop() {
    // 1. 消す
    ctx.clearRect(0, 0, cvs.width, cvs.height);

    // 2. 更新して描く
    x += speed;
    if(x > cvs.width - 50 || x < 0) {
      speed *= -1; // 壁でバウンド
    }

    ctx.fillStyle = '#0d6efd';
    ctx.fillRect(x, 50, 50, 50);

    // 3. 繰り返す
    requestAnimationFrame(loop);
  }
  loop();
}, 100);
マウス・キーボードイベントの取得
ゲームやペイントツールを作るには、ユーザーのマウス操作やキーボード入力を監視し、結果を描画に反映させる必要があります。
Canvas内のマウス座標を取得するには、canvas.getBoundingClientRect()を使って「ブラウザ画面内におけるCanvas要素のズレ」を計算し、マウスの全体座標から引き算しなければなりません。
⭕️ カーソル位置に円を描画(Canvas内でマウスを動かしてください)
cvs.addEventListener('mousemove', function(e) {
/* ❌ 悪い例:画面全体の座標をそのまま使うとズレる */
// const x = e.clientX;
/* 💡 良い例:Canvasの位置を取得して引き算する(必須) */
const rect = cvs.getBoundingClientRect();
const x = e.clientX - rect.left;
const y = e.clientY - rect.top;
/* 正確な座標(x, y)を使って描画処理を行う */
ctx.clearRect(0, 0, cvs.width, cvs.height);
ctx.beginPath();
ctx.arc(x, y, 20, 0, Math.PI * 2);
ctx.fill();
});
HTMLコード表示
<div class="hcanvas-anim2-wrapper">
  <div class="hcanvas-anim2-demo-area">
    <div class="hcanvas-anim2-box">
      <div class="hcanvas-anim2-label">🖱️ マウス座標の正確な取得(イベント監視)</div>

      <div class="hcanvas-anim2-visual">
        <p style="font-size:12px; color:#198754; font-weight:bold; margin:0 0 5px 0;">⭕️ カーソル位置に円を描画(Canvas内でマウスを動かしてください)</p>
        <canvas id="mouseCanvas" width="450" height="150" class="hcanvas-anim2-canvas"></canvas>
      </div>

      <div class="hcanvas-anim2-code">
        <span class="hcanvas-anim2-hl-blue">const</span> cvs = document.getElementById('myCanvas');<br><br>
        cvs.<span class="hcanvas-anim2-hl-green">addEventListener</span>(<span class="hcanvas-anim2-hl-red">'mousemove'</span>, function(e) {<br>
          /* ❌ 悪い例:画面全体の座標をそのまま使うとズレる */<br>
          <span class="hcanvas-anim2-hl-comment">// const x = e.clientX;</span><br><br>
          /* 💡 良い例:Canvasの位置を取得して引き算する(必須) */<br>
          <span class="hcanvas-anim2-hl-blue">const</span> rect = <span class="hcanvas-anim2-hl-green">cvs.getBoundingClientRect()</span>;<br>
          <span class="hcanvas-anim2-hl-blue">const</span> x = e.clientX - rect.left;<br>
          <span class="hcanvas-anim2-hl-blue">const</span> y = e.clientY - rect.top;<br><br>
          /* 正確な座標(x, y)を使って描画処理を行う */<br>
          ctx.clearRect(0, 0, cvs.width, cvs.height);<br>
          ctx.beginPath();<br>
          ctx.arc(x, y, 20, 0, Math.PI * 2);<br>
          ctx.fill();<br>
        });
      </div>
    </div>
  </div>
</div>
CSSコード表示
.hcanvas-anim2-wrapper {
  background-color: #f8f9fa;
  padding: 20px;
  border: 1px solid #dee2e6;
  border-radius: 4px;
  font-family: sans-serif;
}

.hcanvas-anim2-demo-area {
  display: flex;
  justify-content: center;
}

.hcanvas-anim2-box {
  background-color: #ffffff;
  border: 2px dashed #adb5bd;
  padding: 25px;
  width: 100%;
  max-width: 550px;
  border-radius: 4px;
}

.hcanvas-anim2-label {
  font-size: 15px;
  font-weight: bold;
  margin-bottom: 20px;
  color: #333;
}

.hcanvas-anim2-visual {
  background-color: #e9ecef;
  padding: 15px;
  border-radius: 8px;
  margin-bottom: 20px;
  display: flex;
  flex-direction: column;
  align-items: center;
}

.hcanvas-anim2-canvas {
  background-color: #fff;
  border: 1px solid #adb5bd;
  border-radius: 4px;
  max-width: 100%;
  cursor: crosshair;
}

.hcanvas-anim2-code {
  background-color: #282c34;
  color: #abb2bf;
  padding: 15px;
  font-family: monospace;
  font-size: 13px;
  border-radius: 4px;
  line-height: 1.6;
  border-left: 4px solid #198754;
}

.hcanvas-anim2-hl-green {
  color: #98c379;
  font-weight: bold;
}

.hcanvas-anim2-hl-blue {
  color: #61afef;
  font-weight: bold;
}

.hcanvas-anim2-hl-red {
  color: #e06c75;
  font-weight: bold;
}

.hcanvas-anim2-hl-comment {
  color: #6c757d;
  font-style: italic;
}
JavaScriptコード表示
setTimeout(() => {
  const cvs = document.getElementById('mouseCanvas');
  if(!cvs) return;
  const ctx = cvs.getContext('2d');

  // 初期表示
  ctx.fillStyle = '#dc3545';
  ctx.font = '14px sans-serif';
  ctx.textAlign = 'center';
  ctx.fillText('マウスを乗せてください', cvs.width/2, cvs.height/2);

  cvs.addEventListener('mousemove', function(e) {
    // 必須:Canvasの位置を取得してマウス座標を補正
    const rect = cvs.getBoundingClientRect();
    const x = e.clientX - rect.left;
    const y = e.clientY - rect.top;

    ctx.clearRect(0, 0, cvs.width, cvs.height);

    // 追従する円を描画
    ctx.beginPath();
    ctx.arc(x, y, 20, 0, Math.PI * 2);
    ctx.fillStyle = 'rgba(220, 53, 69, 0.5)';
    ctx.fill();
    ctx.strokeStyle = '#dc3545';
    ctx.lineWidth = 2;
    ctx.stroke();

    // 座標テキスト
    ctx.fillStyle = '#333';
    ctx.font = '12px monospace';
    ctx.fillText(`x:${Math.round(x)}, y:${Math.round(y)}`, x, y - 30);
  });

  // マウスが外れたらクリア
  cvs.addEventListener('mouseleave', function() {
    ctx.clearRect(0, 0, cvs.width, cvs.height);
    ctx.fillStyle = '#dc3545';
    ctx.fillText('マウスを乗せてください', cvs.width/2, cvs.height/2);
  });
}, 100);
移動・回転・拡大縮小の実装
キャラクターをその場で回転させたり、マップ全体を拡大縮小・並行移動してズームやパンを実装する機能は、ゲーム開発におけるカメラワークの基本です。
図形を「その場(中心)」で回転・拡大縮小させるには、以下の3つのステップを踏む必要があります。
ctx.translate(x, y)で空間全体の原点(0,0)を図形の中心座標まで移動させる。ctx.rotate(角度)で移動した原点を軸にして空間を回す。- 図形を描画する
⭕️ 原点を移動(translate)してから回す
const y = 75; /* 図形の中心Y */
const w = 60; /* 図形の幅 */
/* 💡 1. 空間を歪める前に現在の状態を保存(必須) */
ctx.save();
/* 💡 2. 原点(0,0)を図形の中心位置まで移動させる */
ctx.translate(x, y);
/* 💡 3. 空間を回転させる(ラジアン指定) */
ctx.rotate( 45 * Math.PI / 180 );
/* 💡 4. 図形を描く(原点が中心にあるので、マイナス幅から描く!) */
ctx.fillStyle = '#ffc107';
ctx.fillRect(-w/2, -w/2, w, w);
/* 💡 5. 保存しておいた正常な空間に戻す(必須) */
ctx.restore();
HTMLコード表示
<div class="hcanvas-anim3-wrapper">
  <div class="hcanvas-anim3-demo-area">
    <div class="hcanvas-anim3-box">
      <div class="hcanvas-anim3-label">🔄 移動・回転(その場で回すテクニック)</div>

      <div class="hcanvas-anim3-visual">
        <p style="font-size:12px; color:#198754; font-weight:bold; margin:0 0 10px 0; width: 100%;">⭕️ 原点を移動(translate)してから回す</p>
        <canvas id="rotateCanvas" width="450" height="150" class="hcanvas-anim3-canvas"></canvas>
      </div>

      <div class="hcanvas-anim3-code">
        const x = 225; /* 図形の中心X */<br>
        const y = 75;  /* 図形の中心Y */<br>
        const w = 60;  /* 図形の幅 */<br><br>
        /* 💡 1. 空間を歪める前に現在の状態を保存(必須) */<br>
        <span class="hcanvas-anim3-hl-red">ctx.save();</span><br><br>
        /* 💡 2. 原点(0,0)を図形の中心位置まで移動させる */<br>
        <span class="hcanvas-anim3-hl-blue">ctx.translate(x, y);</span><br><br>
        /* 💡 3. 空間を回転させる(ラジアン指定) */<br>
        <span class="hcanvas-anim3-hl-blue">ctx.rotate( 45 * Math.PI / 180 );</span><br><br>
        /* 💡 4. 図形を描く(原点が中心にあるので、マイナス幅から描く!) */<br>
        ctx.fillStyle = '#ffc107';<br>
        <span class="hcanvas-anim3-hl-green">ctx.fillRect(-w/2, -w/2, w, w);</span><br><br>
        /* 💡 5. 保存しておいた正常な空間に戻す(必須) */<br>
        <span class="hcanvas-anim3-hl-red">ctx.restore();</span>
      </div>
    </div>
  </div>
</div>
CSSコード表示
.hcanvas-anim3-wrapper {
  background-color: #f8f9fa;
  padding: 20px;
  border: 1px solid #dee2e6;
  border-radius: 4px;
  font-family: sans-serif;
}

.hcanvas-anim3-demo-area {
  display: flex;
  justify-content: center;
}

.hcanvas-anim3-box {
  background-color: #ffffff;
  border: 2px dashed #adb5bd;
  padding: 25px;
  width: 100%;
  max-width: 550px;
  border-radius: 4px;
}

.hcanvas-anim3-label {
  font-size: 15px;
  font-weight: bold;
  margin-bottom: 20px;
  color: #333;
}

.hcanvas-anim3-visual {
  background-color: #e9ecef;
  padding: 15px;
  border-radius: 8px;
  margin-bottom: 20px;
  display: flex;
  flex-direction: column; /* ★横並びを防ぎ、縦並びにする */
  align-items: center;    /* ★Canvasを中央に寄せる */
}

.hcanvas-anim3-canvas {
  background-color: #fff;
  border: 1px solid #adb5bd;
  border-radius: 4px;
  max-width: 100%;
  background-image:
    linear-gradient(rgba(0,0,0,0.05) 1px, transparent 1px),
    linear-gradient(90deg, rgba(0,0,0,0.05) 1px, transparent 1px);
  background-size: 25px 25px;
}

.hcanvas-anim3-code {
  background-color: #282c34;
  color: #abb2bf;
  padding: 15px;
  font-family: monospace;
  font-size: 13px;
  border-radius: 4px;
  line-height: 1.6;
  border-left: 4px solid #198754;
}

.hcanvas-anim3-hl-green {
  color: #98c379;
  font-weight: bold;
}

.hcanvas-anim3-hl-blue {
  color: #61afef;
  font-weight: bold;
}

.hcanvas-anim3-hl-red {
  color: #e06c75;
  font-weight: bold;
}
JavaScriptコード表示
setTimeout(() => {
  const cvs = document.getElementById('rotateCanvas');
  if(!cvs) return;
  const ctx = cvs.getContext('2d');

  let angle = 0;

  function animateRotation() {
    ctx.clearRect(0, 0, cvs.width, cvs.height);

    const x = cvs.width / 2;
    const y = cvs.height / 2;
    const w = 60;

    // 中心点を示す小さな赤丸
    ctx.fillStyle = '#dc3545';
    ctx.beginPath();
    ctx.arc(x, y, 3, 0, Math.PI*2);
    ctx.fill();

    // ★座標変換のコンボ
    ctx.save();                // 1. 保存
    ctx.translate(x, y);       // 2. 原点移動
    ctx.rotate(angle);         // 3. 回転

    // 4. 描画 (移動した原点に対してマイナス座標から)
    ctx.fillStyle = 'rgba(255, 193, 7, 0.8)'; // yellow
    ctx.strokeStyle = '#e0a800';
    ctx.lineWidth = 2;
    ctx.fillRect(-w/2, -w/2, w, w);
    ctx.strokeRect(-w/2, -w/2, w, w);

    ctx.restore();             // 5. 復元

    angle += 0.05; // 回転速度
    requestAnimationFrame(animateRotation);
  }

  animateRotation();
}, 100);
Canvasの描画結果を画像・PDFとして保存
Canvasで描いた図形やグラフ、あるいはユーザーがペイントツールで描いたイラストをブラウザ上の表示で終わらせず、ローカル端末にファイルとして保存させる機能は、Webアプリケーションの価値を高めます。
お絵かきアプリの「画像保存」機能はもちろん、業務システムにおける領収書やレポートの出力など用途は多岐にわたります。
ここでは、Canvasの描画結果をPNGやJPEG画像として書き出す方法、PDFやSVGといった別フォーマットへ変換する際の手法を解説します。
- toDataURLでPNG/JPEG画像としてダウンロード
- PDFファイルやSVGへの変換出力
toDataURLでPNG/JPEG画像としてダウンロード
Canvasに描かれたピクセルデータを画像ファイルとして取り出すメソッドがtoDataURL()です。
また、大容量の画像やパフォーマンスを重視する開発ではtoBlob()が好まれます。
JPEG形式で書き出したい場合は、ユーザーが絵を描き始める前に、ctx.fillStyle = '#ffffff'; ctx.fillRect(0, 0, width, height);を実行し、背景を意図的に白色で塗りつぶしておく必要があります。
保存処理は、目に見えない<a>タグをJavaScriptで動的に生成し、hrefに画像データ、download属性にファイル名を指定して、プログラムから強制的にクリックさせる(a.click())のがよいです。
function downloadPNG() {
const dataUrl = cvs.toDataURL('image/png');
triggerDownload(dataUrl, 'sample.png');
}
/* 💡 2. JPEGで保存する(黒潰れ対策必須!) */
function downloadJPG() {
// ※実際のJPEG書き出しでは、元の絵を消さずに
// 裏側に白いCanvasを合成する等の処理を行います。
const dataUrl = cvs.toDataURL('image/jpeg', 0.9); /* 画質90% */
triggerDownload(dataUrl, 'sample.jpg');
}
/* 💡 3. ダウンロードを強制発火させるハック */
function triggerDownload(url, filename) {
const a = document.createElement('a');
a.href = url;
a.download = filename; // 保存時のファイル名
a.click(); // JSからクリックをシミュレート
}
HTMLコード表示
<div class="hcanvas-dl1-wrapper">

  <div class="hcanvas-dl1-demo-area">
    <div class="hcanvas-dl1-box">
      <div class="hcanvas-dl1-label">💾 toDataURLによる画像ダウンロード</div>

      <div class="hcanvas-dl1-visual">
        <canvas id="downloadCanvas" width="300" height="150" class="hcanvas-dl1-canvas"></canvas>
        <div class="hcanvas-dl1-btn-group">
          <button class="hcanvas-dl1-btn-png" onclick="downloadPNG()">PNGで保存</button>
          <button class="hcanvas-dl1-btn-jpg" onclick="downloadJPG()">白背景にしてJPEGで保存</button>
        </div>
      </div>

      <div class="hcanvas-dl1-code">
        /* 💡 1. 透過PNGとして保存する(デフォルト) */<br>
        <span class="hcanvas-dl1-hl-blue">function</span> downloadPNG() {<br>
          <span class="hcanvas-dl1-hl-blue">const</span> dataUrl = cvs.<span class="hcanvas-dl1-hl-green">toDataURL('image/png')</span>;<br>
          triggerDownload(dataUrl, 'sample.png');<br>
        }<br><br>
        /* 💡 2. JPEGで保存する(黒潰れ対策必須!) */<br>
        <span class="hcanvas-dl1-hl-blue">function</span> downloadJPG() {<br>
          <span class="hcanvas-dl1-hl-comment">// ※実際のJPEG書き出しでは、元の絵を消さずに<br>
          // 裏側に白いCanvasを合成する等の処理を行います。</span><br>
          <span class="hcanvas-dl1-hl-blue">const</span> dataUrl = cvs.<span class="hcanvas-dl1-hl-green">toDataURL('image/jpeg', 0.9)</span>; /* 画質90% */<br>
          triggerDownload(dataUrl, 'sample.jpg');<br>
        }<br><br>
        /* 💡 3. ダウンロードを強制発火させるハック */<br>
        <span class="hcanvas-dl1-hl-blue">function</span> triggerDownload(url, filename) {<br>
          <span class="hcanvas-dl1-hl-blue">const</span> a = document.createElement(<span class="hcanvas-dl1-hl-red">'a'</span>);<br>
          a.href = url;<br>
          a.download = filename; <span class="hcanvas-dl1-hl-comment">// 保存時のファイル名</span><br>
          a.click(); <span class="hcanvas-dl1-hl-comment">// JSからクリックをシミュレート</span><br>
        }
      </div>
    </div>
  </div>
</div>
CSSコード表示
.hcanvas-dl1-wrapper {
  background-color: #f8f9fa;
  padding: 20px;
  border: 1px solid #dee2e6;
  border-radius: 4px;
  font-family: sans-serif;
}

.hcanvas-dl1-demo-area {
  display: flex;
  justify-content: center;
}

.hcanvas-dl1-box {
  background-color: #ffffff;
  border: 2px dashed #adb5bd;
  padding: 25px;
  width: 100%;
  max-width: 500px;
  border-radius: 4px;
}

.hcanvas-dl1-label {
  font-size: 15px;
  font-weight: bold;
  margin-bottom: 20px;
  color: #333;
}

.hcanvas-dl1-visual {
  background-color: #f1f3f5;
  padding: 20px;
  border-radius: 8px;
  margin-bottom: 20px;
  display: flex;
  flex-direction: column;
  align-items: center;
}

.hcanvas-dl1-canvas {
  background-color: transparent;
  border: 1px solid #adb5bd;
  border-radius: 4px;
  background-image:
    linear-gradient(45deg, #e9ecef 25%, transparent 25%, transparent 75%, #e9ecef 75%, #e9ecef),
    linear-gradient(45deg, #e9ecef 25%, transparent 25%, transparent 75%, #e9ecef 75%, #e9ecef);
  background-size: 20px 20px;
  background-position: 0 0, 10px 10px;
  margin-bottom: 15px;
  max-width: 100%;
}

.hcanvas-dl1-btn-group {
  display: flex;
  gap: 10px;
  width: 100%;
  justify-content: center;
}

.hcanvas-dl1-btn-png {
  background-color: #0d6efd;
  color: #fff;
  border: none;
  padding: 10px 15px;
  border-radius: 4px;
  font-weight: bold;
  cursor: pointer;
  flex: 1;
}

.hcanvas-dl1-btn-jpg {
  background-color: #198754;
  color: #fff;
  border: none;
  padding: 10px 15px;
  border-radius: 4px;
  font-weight: bold;
  cursor: pointer;
  flex: 1;
}

.hcanvas-dl1-code {
  background-color: #282c34;
  color: #abb2bf;
  padding: 15px;
  font-family: monospace;
  font-size: 13px;
  border-radius: 4px;
  line-height: 1.6;
  border-left: 4px solid #198754;
}

.hcanvas-dl1-hl-green {
  color: #98c379;
  font-weight: bold;
}

.hcanvas-dl1-hl-blue {
  color: #61afef;
  font-weight: bold;
}

.hcanvas-dl1-hl-red {
  color: #e06c75;
  font-weight: bold;
}

.hcanvas-dl1-hl-comment {
  color: #6c757d;
  font-style: italic;
}
JavaScriptコード表示
let dlCanvas, dlCtx;

function initDownloadCanvas() {
  dlCanvas = document.getElementById('downloadCanvas');
  if(!dlCanvas) return;
  dlCtx = dlCanvas.getContext('2d');

  // 透明な背景に青い円を描く
  dlCtx.fillStyle = '#0d6efd';
  dlCtx.beginPath();
  dlCtx.arc(150, 75, 40, 0, Math.PI * 2);
  dlCtx.fill();
}

function triggerDownload(url, filename) {
  const a = document.createElement('a');
  a.href = url;
  a.download = filename;
  document.body.appendChild(a);
  a.click();
  document.body.removeChild(a);
}

function downloadPNG() {
  if(!dlCanvas) return;
  const dataUrl = dlCanvas.toDataURL('image/png');
  triggerDownload(dataUrl, 'canvas-transparent.png');
}

function downloadJPG() {
  if(!dlCanvas) return;
  // JPEG化の黒潰れ対策:現在の絵を保存し、白背景を敷いてから描き直す
  // (※実務では非表示の別Canvasを用意して合成する方が安全です)
  const originalData = dlCtx.getImageData(0, 0, dlCanvas.width, dlCanvas.height);

  // 白で塗りつぶし
  dlCtx.fillStyle = '#ffffff';
  dlCtx.fillRect(0, 0, dlCanvas.width, dlCanvas.height);

  // 元の絵を上から書き戻す(簡易的)
  // 実際はdrawImageで再合成するのがベストですが、ここではモック処理とします
  dlCtx.fillStyle = '#0d6efd';
  dlCtx.beginPath();
  dlCtx.arc(150, 75, 40, 0, Math.PI * 2);
  dlCtx.fill();

  const dataUrl = dlCanvas.toDataURL('image/jpeg', 0.9);
  triggerDownload(dataUrl, 'canvas-whitebg.jpg');

  // 透過状態に戻す(デモ用)
  setTimeout(() => {
    dlCtx.clearRect(0, 0, dlCanvas.width, dlCanvas.height);
    dlCtx.putImageData(originalData, 0, 0);
  }, 500);
}

setTimeout(initDownloadCanvas, 100);
PDFファイルやSVGへの変換出力
「Canvasに描いた請求書やグラフをPDFとして出力したい」あるいは「拡大しても劣化しないSVGデータとして書き出したい」という高度な要件も実務では発生します。
- PDFへの変換
実務ではjsPDFという外部のJavaScriptライブラリを使用します。
CanvasのtoDataURLで書き出した画像データをjsPDFに渡し、画像をPDFのページ内に貼り付けて出力するという手順を踏みます。 - SVGへの変換
一度ピクセルになってしまったCanvasから完璧なSVGを生成することは不可能です。
そのため、canvas2svgの特殊なライブラリを使用し、描画命令を発行した瞬間に、裏側でSVGタグ(<rect>)を同時に生成させるというアプローチをとります。
⚠️ 標準APIには .toPDF() という機能はありません
<script src="https://cdnjs.cloudflare.com/ajax/libs/jspdf/2.5.1/jspdf.umd.min.js"></script>
/* 💡 2. Canvasを画像化してPDFに貼り付けるロジック */
function exportToPDF() {
// A. CanvasをJPEG画像として取得
const imgData = canvas.toDataURL('image/jpeg', 1.0);
// B. jsPDFのインスタンスを作成(A4サイズなど)
const { jsPDF } = window.jspdf;
const doc = new jsPDF('landscape', 'mm', 'a4');
// C. PDFの中に画像を貼り付ける(x, y, width, height)
doc.addImage(imgData, 'JPEG', 10, 10, 277, 190);
// D. PDFファイルとしてダウンロード
doc.save('canvas-report.pdf');
}
HTMLコード表示
<div class="hcanvas-dl2-wrapper">

  <div class="hcanvas-dl2-demo-area">
    <div class="hcanvas-dl2-box">
      <div class="hcanvas-dl2-label">📄 PDF・SVGへの変換(外部ライブラリ利用)</div>

      <div class="hcanvas-dl2-visual">
        <p style="font-size:12px; color:#dc3545; font-weight:bold; margin:0 0 5px 0;">⚠️ 標準APIには .toPDF() という機能はありません</p>
        <div class="hcanvas-dl2-mock-pdf">
          <div style="font-size: 30px; margin-bottom: 5px;">📦</div>
          <div style="font-size: 13px; font-weight: bold; color: #333;">jsPDFライブラリを使用します</div>
        </div>
      </div>

      <div class="hcanvas-dl2-code">
        <!-- 💡 1. 外部ライブラリ(jsPDF)を読み込む --><br>
        <script src="https://cdnjs.cloudflare.com/ajax/libs/jspdf/2.5.1/jspdf.umd.min.js"></script><br><br>
        /* 💡 2. Canvasを画像化してPDFに貼り付けるロジック */<br>
        <span class="hcanvas-dl2-hl-blue">function</span> exportToPDF() {<br>
          <span class="hcanvas-dl2-hl-comment">// A. CanvasをJPEG画像として取得</span><br>
          <span class="hcanvas-dl2-hl-blue">const</span> imgData = canvas.<span class="hcanvas-dl2-hl-green">toDataURL('image/jpeg', 1.0)</span>;<br><br>
          <span class="hcanvas-dl2-hl-comment">// B. jsPDFのインスタンスを作成(A4サイズなど)</span><br>
          <span class="hcanvas-dl2-hl-blue">const</span> { jsPDF } = window.jspdf;<br>
          <span class="hcanvas-dl2-hl-blue">const</span> doc = <span class="hcanvas-dl2-hl-green">new jsPDF('landscape', 'mm', 'a4')</span>;<br><br>
          <span class="hcanvas-dl2-hl-comment">// C. PDFの中に画像を貼り付ける(x, y, width, height)</span><br>
          doc.<span class="hcanvas-dl2-hl-green">addImage(imgData, 'JPEG', 10, 10, 277, 190)</span>;<br><br>
          <span class="hcanvas-dl2-hl-comment">// D. PDFファイルとしてダウンロード</span><br>
          doc.<span class="hcanvas-dl2-hl-red">save('canvas-report.pdf')</span>;<br>
        }
      </div>
    </div>
  </div>
</div>
CSSコード表示
.hcanvas-dl2-wrapper {
  background-color: #f8f9fa;
  padding: 20px;
  border: 1px solid #dee2e6;
  border-radius: 4px;
  font-family: sans-serif;
}

.hcanvas-dl2-demo-area {
  display: flex;
  justify-content: center;
}

.hcanvas-dl2-box {
  background-color: #ffffff;
  border: 2px dashed #adb5bd;
  padding: 25px;
  width: 100%;
  max-width: 500px;
  border-radius: 4px;
}

.hcanvas-dl2-label {
  font-size: 15px;
  font-weight: bold;
  margin-bottom: 20px;
  color: #333;
}

.hcanvas-dl2-visual {
  background-color: #f1f3f5;
  padding: 20px;
  border-radius: 8px;
  margin-bottom: 20px;
  display: flex;
  flex-direction: column;
  align-items: center;
}

.hcanvas-dl2-mock-pdf {
  width: 100%;
  height: 100px;
  background-color: #fff;
  border: 1px solid #ced4da;
  border-radius: 4px;
  display: flex;
  flex-direction: column;
  justify-content: center;
  align-items: center;
  box-shadow: 0 4px 6px rgba(0,0,0,0.05);
}

.hcanvas-dl2-code {
  background-color: #282c34;
  color: #abb2bf;
  padding: 15px;
  font-family: monospace;
  font-size: 13px;
  border-radius: 4px;
  line-height: 1.6;
  border-left: 4px solid #dc3545;
}

.hcanvas-dl2-hl-green {
  color: #98c379;
  font-weight: bold;
}

.hcanvas-dl2-hl-blue {
  color: #61afef;
  font-weight: bold;
}

.hcanvas-dl2-hl-red {
  color: #e06c75;
  font-weight: bold;
}

.hcanvas-dl2-hl-comment {
  color: #6c757d;
  font-style: italic;
}
まとめ
分かりやすいようにまとめを記載します。
- 基本定義
JavaScriptを用いてピクセルベースで図形や画像を描画するためのHTML要素。 - コンテキスト取得
描画命令を出すために、JS側でgetContext('2d')を取得して処理を行う。 - サイズ指定の原則
描画の歪みを防ぐため、画用紙の解像度はCSSではなくHTMLのwidth/height属性で指定する。 - 高解像度(Retina)対策
window.devicePixelRatioを用いて実際の画素数を倍増させ、CSSで表示サイズを縮小することで「ぼやけ」を解消する。 - 図形描画の基本
beginPath()でパスをリセットし、図形や線を定義した後、fill()やstroke()を実行する。 - 画像合成と加工
drawImage()による外部画像の配置やgetImageData()によるピクセル単位の色調操作が可能。 - アニメーション
clearRect()による画面消去とrequestAnimationFrameを組み合わせたループ処理で実装する。 - 座標の取得
マウスの正確な座標を得るにはgetBoundingClientRect()を用いてCanvas要素自体の画面上のズレを差し引く必要がある。 - データのエクスポート
toDataURL()を用いてPNG/JPEG画像として保存可能。
よくある質問(FAQ)
HTMLのCanvasとは何ですか?何に使われますか?
ブラウザ上で、JavaScriptを使って図形や画像、アニメーションを動的に描画するHTMLタグ(<canvas>)です。
プラグインなしで高度なグラフィック処理ができるため、ブラウザゲームの開発、グラフやチャートの描画、画像編集ツール、パーティクルなどのWebアニメーションなどに使われています。
CanvasとSVGの決定的な違いは何ですか?どちらを使うべきですか?
描画の仕組みが根本的に異なります。
用途に合わせて使い分けてください。
- Canvas(ピクセル描画)
絵の具で一枚のキャンバスに絵を描くような仕組みです。
一度描いたものは「画像(ピクセル)」になるため、大量のオブジェクトを動かすゲームなどでも動作が軽いのが特徴です。 - SVG(ベクター描画)
数式で図形を描くため、どれだけ拡大しても画質が荒れません。
また、一つひとつの図形がHTMLの要素として存在するため、CSSで色を変えたりクリックイベントを付けたりしやすいのが特徴です。
ロゴやアイコン、静的な図表に向いています。
Canvasに描いた図形や文字がぼやけたり、歪んだりするのはなぜですか?
サイズの指定方法を間違えている可能性が高いです。
CanvasのサイズをCSS(style="width: 500px;"など)で指定すると、デフォルトの画用紙サイズ(300x150)が引き伸ばされて表示されるため、ぼやけや歪みが発生します。
HTMLの属性(<canvas width="500" height="500">)か、JavaScriptから直接ピクセルサイズを指定してください。
スマートフォンのような高解像度(Retina)ディスプレイでぼやける場合は、デバイスピクセル比(devicePixelRatio)に合わせて画用紙のサイズを2倍などに拡大する処理が必要です。
Canvasに描いた絵を画像として保存することはできますか?
はい、可能です。
JavaScriptのcanvas.toDataURL()というメソッドを使うと、Canvasに描かれている内容をPNGやJPEGなどの画像データに変換できます。
このデータを見えない<a>タグのhrefにセットし、download属性を付けてJavaScriptからクリックさせることで、ユーザーの端末に画像ファイルとして保存できます。
Canvasをスマホの画面幅に合わせてレスポンシブ対応させるにはどうすればいいですか?
JavaScriptを使って、画面サイズが変わるたびにCanvasのサイズを再計算させる必要があります。
CSSでwidth: 100%;とするだけでは画像が歪んでしまうため、window.addEventListener('resize', ...) で画面のリサイズイベントを監視します。
リサイズされる度に、親要素の幅を取得してCanvasのwidthとheight属性に代入し、中身の図形を「再描画」するのがよいです。